
You are here:
Get Started with the Archive App
The Archive app helps you manage storage costs and enhance performance by moving historical data out of your org.
To make sure that you have a safe rollout, follow this workflow.
- Configure in production.
- Validate in a sandbox.
- Deploy Archive policies.
- Maximize Org Performance with the Archive App
As your data grows, so does the complexity of managing it. The Archive app is a powerful tool designed to help Salesforce admins proactively manage storage limits while keeping historical information secure and accessible. By moving inactive records and attachments into a specialized archive type, you restore system speed and make sure that your org remains a high-performance environment. - Calculate Archive App Storage Requirements
Archive inactive records and file attachments to maintain compliance and reduce storage costs. Keeping your storage usage at or under 80% ensures peak system performance and prevents indexing delays in the Archive app. - Archive App Storage Calculation Worksheet
Calculate the amount of storage that you require to archive data and files in the Archive app. - Archive App Storage Strategy Scenarios
Determine Archive storage that you need based on your current org health. - Archive App Storage Q&A
Common questions for calculating and monitoring storage usage in the Archive app.
Initial Production Configuration
Before testing in a sandbox, establish the foundation in your production environment.
- Assign the Archive Admin permission set to yourself and any other admins who manage the app. See Archive Admin Permission Set.
-
Complete the initial authentication process within the Production
org to link the service.
 Important This step isn't relevant for Hyperforce users.
Sandbox Alignment
When you configure your production environment, align your sandbox environment to mirror the license state.
- Go to your sandbox org.
- Use the Match Production Licenses feature.
- If licenses or features are missing in your sandbox, follow the steps in How to Match Production and Sandbox Licenses Without a Sandbox Refresh. This Salesforce Support video demonstrates how to make the sandbox recognize the active Archive subscription. See Licenses or Features Are Missing in Sandbox.
Define Your Archiving Strategy
Before creating policies, identify which data is no longer needed for daily operations.
- On the Archive Homepage, go to the Storage Analyzer. Use the analyzer to identify which objects, such as EmailMessage or Task, are consuming the most space. See Archive Storage Analyzer.
- Work with stakeholders to understand archiving goals and retention periods that define how long records remain in your org versus in your archive. See Get Started with Archive Policies.
- Decide what data gets purged rather than archived. See Retention vs Purge Policies in the Archive App.
- Customize Archive to your specific needs. See Configure Archive Settings.
Create and Test Policies in a Sandbox
Build your policies in the sandbox to make sure that they align with your business rules.
- Create Archive policies with Related Object Selection. For example, you can archive ContentDocuments and EmailMessages with Related Tasks. See Create Archive Policies.
-
Before running the policy, confirm that the Authenticated User has
access to all necessary fields. See Run an
Archive Field-Level Security (FLS) Report.
Important This step isn't relevant for Hyperforce users.
- After you test archiving records, verify that you can unarchive a test record successfully. See Unarchive from Archive Search or Archive Widget.
- Review guidelines on when to use specific policy types. See Retention vs Purge Policies in the Archive App.
Configure the User Experience
Configure the Archive component and download controls to provide end users with intuitive access to archived data within your org. See Authenticated User Permission Requirements for Archive.
- Determine which users need permission to view records, set up policies, and unarchive records.
-
Configure the Archive component to show archived data within
Salesforce records. See Set
Up the Archive Component in the Archive App.
To learn more about the Archive component, see Archive Component Restriction Rules, Add the Archive Component to Lightning Pages, and Grant Access to the Archive Component in Experience Cloud.
- Set up Archive Search for user and admin functions. See Archive Search.
- Configure GDPR-compliant Right To Be Forgotten features. See Archive Apex—Right to Be Forgotten (RTBF).
-
Review options for exporting archived data to AWS S3 for analytics.
To import from external sources, prepare your data and offload it
into Archive. See Export to AWS S3 Bucket and Prepare Your Data and AWS S3 Environment for
Archive Import.
Important Exporting to AWS S3 isn't relevant for Hyperforce users.
Deploy to Production
Move from your sandbox to the production environment with validated, tested settings.
- Establish consistency by repeating your configuration steps in the target production environment.
- Confirm that the Authenticated User and any additional Salesforce admins performing Archive Admin activities have the Archive Admin permission set. Assign the relevant permission sets to your end users. See Authenticated User Permission Requirements for Archive.
Troubleshoot and Monitor
Resolve common issues and review error logs to make sure that the smooth operation of archiving policies. See Common Errors and Warnings in the Archive App.
Learn how to abort a policy mid-operation or restore records from completed Archive operations. See Archive Activities Tab.
Storage & Licensing
Your subscription includes separate licenses (SKUs) for file and data storage. To monitor your consumption, manage available space, and stay within your limits, refer to the Archive Dashboard on the home page. See Archive Dashboard (Home Tab).
Maximize Org Performance with the Archive App
As your data grows, so does the complexity of managing it. The Archive app is a powerful tool designed to help Salesforce admins proactively manage storage limits while keeping historical information secure and accessible. By moving inactive records and attachments into a specialized archive type, you restore system speed and make sure that your org remains a high-performance environment.
- Slower reporting, dashboard refreshes, global searches and indexing delays
- Higher expenditures for extra live data and file increments
- Full system errors, such as blocked record creation when you reach 100% usage
Strategic Data Management
To prevent slow or interrupted performance, your options are to delete data manually or archive it. Deletion removes information permanently. Archiving with the Archive app preserves data access and offers the automation, security, and visibility needed to maintain a lean org without losing historical context.
Automated Lifecycle Management
Build automated policies that reduce the length of time admins spend on data management tasks.
- Custom Retention Rules: Define when records are archived based on custom criteria, such as Closed-Lost Opportunities older than 2 years.
- Scheduled Execution: Set policies to run nightly, weekly, or monthly.
- Relationship Preservation: The app automatically identifies and archives related child records, such as Tasks and Notes, along with the root record.
Continuous Data Access
Archived data remains accessible without cluttering your live org. In this way, admins can retrieve archived data when and where they need it.
- Archive Widget: Add an Archive widget to standard page layouts so users can view archived related lists directly on a live record.
- Unarchive Options: If business needs change, an authorized user can restore a record and all its original relationships back to the live org with a single click.
Increased Visibility and Compliance
While data storage totals are important, detailed data usage information shows where users spend most of their time. Details about your most and least used data helps you select which data to keep in active production, archive, or delete.
- Storage Analyzer: Visualize object growth and predict when you reach storage thresholds.
- Enhanced Security: Archived data is encrypted and read-only to help meet GDPR, HIPAA, or CCPA requirements.
- Immutable Audit Trails: Protect against accidental modification of historical data while reducing your active data footprint.
Calculate Archive App Storage Requirements
Archive inactive records and file attachments to maintain compliance and reduce storage costs. Keeping your storage usage at or under 80% ensures peak system performance and prevents indexing delays in the Archive app.
| User Permissions Needed | |
|---|---|
| To view storage usage: | Manage Users |
When an org exceeds 80% of its storage limit, system performance can degrade. Archiving records before reaching 100% capacity prevents "System Full" errors and ensures faster reporting and indexing.
Archive storage consists of these distinct types.
- Data Storage: Stores the text and field values of a record.
- File Storage: Stores associated attachments and images.
Calculating both types separately makes sure that the Related Files list remains accessible for archived records.
Before you purchase or provision units, calculate your current usage and required buffer.
View Your Current Storage Usage
- From Setup, enter Storage Usage in the Quick Find box, then select Storage Usage.
-
Review the Data Storage and File Storage tables to see your
current percent of use.
 Tip Review the Top Objects list to identify which records, such as Tasks or Emails, consume the most space.
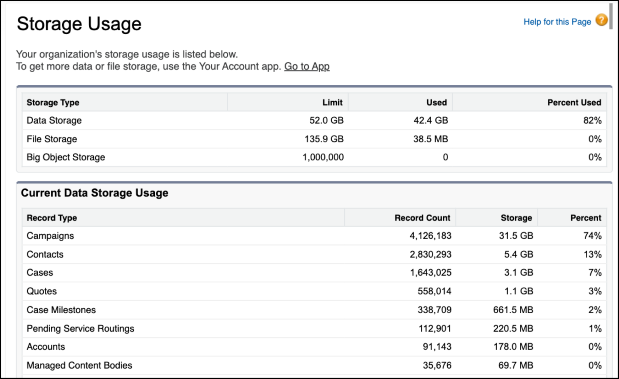
Convert Megabytes to Gigabytes
- Archive storage is provisioned in whole gigabytes (GB). To align your usage with pricing, divide your current megabyte (MB) usage by 1,000.
-
Round up to the nearest whole number. You can't purchase Archive
storage in fractions.
Tip While some systems use 1,024 MB as a conversion, we use the standard 1,000 MB for Archive provisioning to ensure simplicity and alignment with standard billing units.
For example, 25,600 MB ÷ 1,000 = 25.6 GB. You purchase 26 GB.
Determine Your Minimum Purchase
Calculate your needs for Data Storage first, then repeat the steps for File Storage.
Your total need is based on these factors.
- Limit Usage: The amount currently exceeding your limit.
- Performance Buffer: 20% of your total allowance if your usage is higher than 80%.
Archive App Storage Calculation Worksheet
Calculate the amount of storage that you require to archive data and files in the Archive app.
| Component | How to Calculate | Total |
|---|---|---|
| Current Usage Over Limit | (Current Usage) - (Plan Limit) | ______ GB |
| Performance Buffer | (Plan Limit) × 0.20 | + ______ GB |
| Minimum Purchase | Sum of Over Limit + Buffer | = ______ GB |
Archive App Storage Strategy Scenarios
Determine Archive storage that you need based on your current org health.
Scenario 1: Clear an Overage (Usage > 100%)
If your org exceeds its limit, clear the overage and create a buffer to prevent hitting the limit again.
Current State: 115% usage (11.5 GB used of a 10 GB limit).
The Goal: Clear the 1.5 GB overage and add a 2 GB buffer (20% of your limit).
Total Archive Needed: 4 GB (rounded up).
Result: Your live org storage usage drops to 80%, restoring optimal performance.
Scenario 2: Proactive Maintenance (Usage at 80%)
At 80% usage, org performance begins to decrease. Archiving now prevents System Full errors before they occur.
Current State: 80% usage (8 GB used of a 10 GB limit).
The Goal: Move a 20% buffer (2 GB) into Archive storage.
Total Archive Needed: 2 GB.
Result: Your live org storage usage drops to 60%, ensuring faster reporting and indexing.
Archive App Storage Q&A
Common questions for calculating and monitoring storage usage in the Archive app.
Q: Why do I need to pay for both Data Storage and File Storage?
A: These two types handle different types of information. Data Storage keeps the actual text and field values of your records. File Storage saves your images and attachments. Keeping these objects separate makes sure that your archived records still show their related files.
Q: Can I edit or report on archived records?
A: No. Archived records are read only and can't be edited or included in standard Salesforce reports. To modify or report on these records, first unarchive them to restore them to the live environment.
Q: Why include a 20% buffer?
A: Archive storage is most effective when it handles more than just the overflow. By archiving your overage plus a 20% buffer, you remove inactive records and files, which keeps your live org fast and responsive.
Q: Why is storage usage over 80% a concern?
A: Orgs with storage usage higher than 80% experience degraded performance. Acting at this stage prevents system slowdowns.
Q: Can I buy half a gigabyte?
A: No. Archive storage is provisioned in whole units (integers). If your calculation results in a decimal, always round up to the next whole number to ensure full coverage.
Q: How do I track Archive storage?
A: You can monitor your usage through these methods.
- After you purchase Archive, the Storage Analyzer is provisioned in your org. This dashboard provides a visual representation of your storage trends and helps you identify which objects are growing most quickly.
- You can track general storage metrics via the automated Salesforce Monthly Account Summary that reports the past month's usage sent to your Salesforce billing contact's email.
Q: What happens if I exceed my Archive storage limit?
A: If your archiving needs exceed your initial purchase, you can add more capacity to your subscription at any time. To make sure that you have uninterrupted service and stay within your limits, contact your Account Executive to provision more storage units.