
Allow Experience Cloud App Users to Initiate Deletion of Their Data
The App Store Review Guideline 5.1.1 (v) requires that all apps must allow users to initiate deletion of their account from within the app. Apple can remove your app from its App Store if your app doesn't meet this requirement.
Required Editions
| Setup for Mobile Publisher available in: Lightning Experience |
| Setup for Mobile Publisher available in: production only (not sandbox) |
| Available in Lightning Experience in: Enterprise, Performance, and Unlimited Editions |
| User Permissions Needed | |
|---|---|
| To enable external user deactivation option: | Customize Application |
This requirement affects your iOS Mobile Publisher for Experience Cloud app if its associated Experience Cloud site allows guest users to self-register. To meet this requirement, first allow your users to deactivate their accounts from the site, and then manually delete their information from the org.

- From Setup, enter user management settings in the Quick Find box, then select User Management Settings.
- Enable the User Self Deactivate setting to allow your site users to deactivate their account.
- For the site you'd like to allow user self-deactivation, open the site’s Experience Builder User Settings (My Settings) page.
-
Select the Customizable User Settings component on the User
Settings (My Settings) page. Configure the component’s Account Details properties.
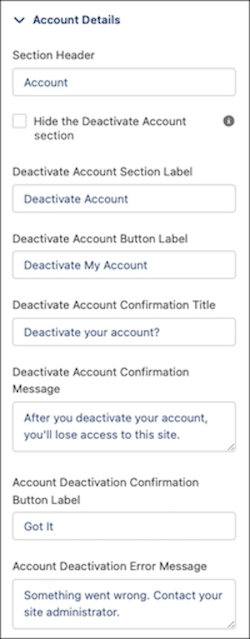 Make sure to deselect the Hide the Deactivate Account section checkbox, so that your users see the Deactivate My Account button.
Customize the Deactivate Account Button label, and other Deactivate Account user settings, to use the term Delete rather than Deactivate. This customization, and subsequent deletion of user data from the org, ensures that you meet Apple’s Account Deletion requirements.
Note You may not want to use the Customizable User Settings component to initiate the deletion of user data. For example, if you have special branding requirements. Instead, you can build your own custom component or use a Flow component. See the example for details on using a Flow component for this purpose. -
Create a notification that informs you when a user has deactivated their account and
initiated the deletion of their data.
For example, use a custom or Flow component, or an Apex trigger for notification.
-
After a user deactivates their account, delete all of the user’s data stored in the
Salesforce platform. Follow your local data protection and privacy regulations. For
information on deleting user data from the Salesforce platform, refer to Data Deletion for Experience Cloud Sites, Data Deletion for the Salesforce Platform, and
Let Users Scramble Their User Data.
Using an Apex query, you can programmatically revoke the app user’s OAuth access token and delete their ThirdPartyAccountLink (TPAL). Apex queries that return multiple tokens and TPALs, can result in performance issues and rapidly reach the transaction limit. You can get around this limit by performing queries in a batch job. Here are some examples.
See Also
- Apple App Store Review Guidelines 5.1.1 (v): Data Collection and Storage
- Knowledge Article: Allowing Mobile Publisher for Experience Cloud App Users to Initiate Deletion of Their Data
- Set Up and Maintain Your Salesforce Organization Help: Enable User Self-Deactivation
- Experience Cloud Help: Customizable User Settings
- Experience Cloud Help: Flow
- Automate Your Business Process: Build a Flow
- Apple App Store Review Guidelines 5.11: Data Collection and Storage
Example 1: Use a Flow Component to Allow Users to Deactivate Their Account
You may want to use a Flow component instead of the Customizable User Settings component to allow users to deactivate account.
- Assign the Run Flows user permission to your site users using their profile or a permission set.
- Build the new flow.
- From Setup, enter flow in the Quick Find box, then select Flows.
- Click New Flow.
- Choose Screen Flow for the flow type, and then click Create.
- Add the Update Records element to the canvas.
-
In the New Update Records window, specify the following information.
- Label: Deactivate User Account
- API Name: Deactivate_User_Account
- Select Specify conditions to identify records, and set fields individually
- Object: User
- Filter User Records
- Field: Id
- Operator: Equals
- Value: {$User.Id}
- Set Field Values for the User Records
- Field: isActive
- Value: {!$GlobalConstant.False}
- Filter User Records
- Click Done.
- Click Save.
-
In the Save the flow window, specify the following information and then click
Save.
- Flow Label: User Self-Deactivation
- Flow API Name: User_Self_Deactivation
- Click Activate.
-
Using Experience Builder, add the Flow component to your site.
Note For this example, it's recommended that you don't directly add the Flow component to the User Settings page. Instead, update the flow to add at least a start screen, so that user account deactivation doesn't occur as soon as the page is displayed or the flow launched. Then add the Flow component to a new page and link to that page from the User Settings page.
- Select the Flow component.
- In the component's property editor, select Use Self-Deactivation from the Flow dropdown menu.
- If you're using audience targeting, make sure that the user identified to test the app has access to the page containing the Flow component.
- Publish the site.
Example 2: Use a Flow Component for Notification that a User has Deactivated Their Account and Initiated the Deletion of their Data
You must know if a user has deactivated their account and initiated the deletion of their data, so that you can then delete their data from the org. One way to accomplish this is by modifying the flow created in the previous example.
- Using Flow Builder, select the User Self-Deactivation flow.
- On the canvas, add the Action element below the Update Records element.
-
In the New Action window, specify the following information.
- Action: Send Email
- Label: Send Email
- API Name: Send_Email
- Body: This user has self-deactivated their account: {!$User.Id} and would like to delete their account information
- Subject: New deactivated user
- Email Addresses (comma-separated): Enter the email recipient, for example the org admin's email.
- Click Done.
- Click Save and then Activate.
Example 3: Use Apex to Revoke User’s OAuth Access Token
userId of the user who wants to initiate deletion of their account.
You can filter the query by appName to return the app tokens you want. If you’re using
flows, keep in mind that flows don’tallow create, update, or delete actions to be taken
in the same transaction (which is a single method in Apex) as a lookup or callout.
Example 4: Use Apex to Delete the ThirdPartyAccountLink (TPAL)
userId of the user who wants to initiate deletion of their
account to query for all associated TPALs. The query then deletes each returned
TPAL.
A few things to note:
- The database table has an index on the
OrganizationId,SsoProviderId,Provider, anduserId(parentId) fields. Since the query includes these fields in thewhereclause (OrganizationIdis used automatically), the index can be used for optimization. - Make sure you have the ManageUsers user permission (otherwise, you’re calling your own
userId). - The org must have the EditThirdPartyAccountLink org permission.
