
You are here:
Override Android App Links to Your Mobile Publisher App
Mobile Publisher for Experience Cloud apps support app links on Android. By default, when a user taps an app link to your Mobile Publisher app, the link opens to the page inside your app. To override the default behavior and set certain links to open outside of your app, use an Apex class and a Visualforce page. For example, if you want the link to your app’s registration page to open in a web browser.
Complete these steps to override the default behavior of app links to your Android app.
- Create an Apex class named
ReDirectToCustomUniversalAndAppLinks.
 Note You must use the same Apex class for both the Android and iOS versions of your app. If you already created the ReDirectToCustomUniversalAndAppLinks Apex class for the iOS version of your app, continue to step 2.
- From Setup, in the Quick Find box, enter Apex Classes, and then select Apex Classes.
- Click Developer Console.
- In the Developer Console, click File, select New, and then select Apex Class.
- Name the class ReDirectToCustomUniversalAndAppLinks.
- Add this code to the Apex class.
global class ReDirectToCustomUniversalAndAppLinks implements Site.UrlRewriter {
  global PageReference mapRequestUrl(PageReference srcUrl) {
    String url = srcUrl.getUrl();
    // Code for Android
    if (url!=null && url.endsWith('assetlinks.json')) {
      url = '/CustomAssetLink';
      return new PageReference(url);
    }
    // Code for iOS
    if (url!=null && url.endsWith('apple-app-site-association')) {
      url = '/CustomAASA';
      return new PageReference(url);
    }
  return null;
}
global PageReference[] generateUrlFor(PageReference[] srcUrls) {
  return null;
}
}
- Create a Visualforce page named CustomAssetLink.
- Edit this sample Visualforce markup to define the pages in your Experience Cloud site to open outside of your app.
- For the value of package_name, replace YOUR_ANDROID_APP_PACAKGE_NAME with your app’s package name.
- For the value of sha256_cert_fingerprints, replace the example value with your app’s SHA-256 fingerprint.
- To override certain links to your app, add and define new values in the relation field.
CustomAssetLink.vfp
<apex:page standardStylesheets="false" sidebar="false" showHeader="false" applyHtmlTag="false" applyBodyTag="false" contentType="text/json"> [ { "relation": [ "delegate_permission/common.handle_all_urls" ], "target": { "namespace": "android_app", "package_name": "YOUR_ANDROID_APP_PACAKGE_NAME", "sha256_cert_fingerprints": [ "AB:C1:2D:E3:FG:45:67:8H:IJ:K9:01:23:LM:2N:OP:Q4:R5:67:ST:8U:90:12:V3:45:6W:XY:78:9Z:AB:C0:1D:23" ] } } ] </apex:page> - Enter the edited markup into the Visualforce Markup field of the CustomAssetLink Visualforce page, and save.
- Make the CustomAssetLink Visualforce page available to your Experience Cloud site and mobile app.
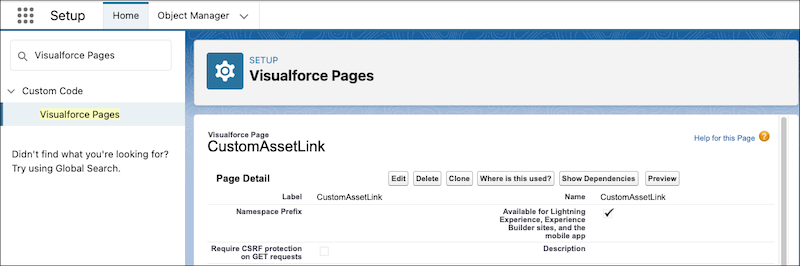
- From Setup, in the Quick Find box, enter Visualforce Pages, and then select Visualforce Pages.
- Click the CustomAssetLink label for the Visualforce page that you created.
- In the Page Detail settings, select Available for Lightning Experience, Experience Builder sites, and the mobile app.
- Enable the CustomAssetLink Visualforce page for your Experience Cloud site.
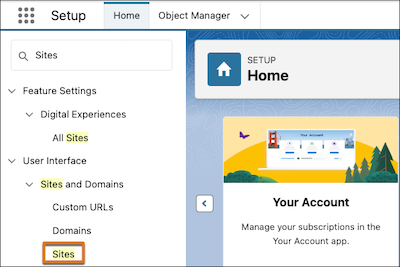
- From Setup, in the Quick Find box, enter Sites, and then select Sites.
- Click the site label for your Mobile Publisher app’s Experience Cloud site.
- Click Public Access Settings.
- Click Enabled Visualforce Page Access.
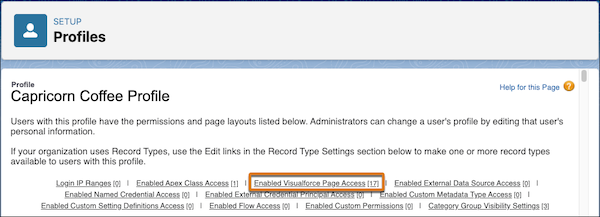
- Click Edit, and then add the CustomAssetLink page to the list of enabled Visualforce pages.
- Save your changes.
- From Setup, in the Quick Find box, enter Sites, and then select Sites.
- Set the ReDirectToCustomUniversalAndAppLinks Apex class as the URL rewriter for your Experience Cloud site.
- In the Site Detail section of your Experience Cloud site, click Edit.
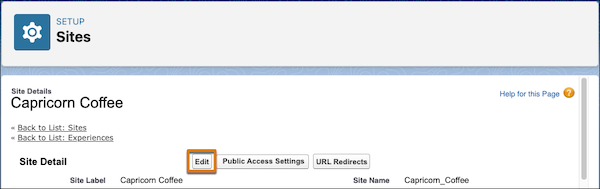
- In the URL Rewriter Class field, search for and select the ReDirectToCustomUniversalAndAppLinks Apex class.
- Save your changes.
- In the Site Detail section of your Experience Cloud site, click Edit.
Did this article solve your issue?
Let us know so we can improve!
