
You are here:
Create and Manage CMS Channels
To deliver content from Salesforce CMS workspaces to your audience, create a CMS channel in the Digital Experience app. Select a channel type, and configure the channel’s settings, depending on your use case. Edit channel settings at any time, and when you no longer need the channel, you can delete it from your org.
Required Editions
| Available in: Lightning Experience |
| Available in: Enterprise, Performance, Unlimited, and Developer Editions |
| User Permissions Needed | |
|---|---|
| To create a channel in the Digital Experiences app: | Modify All Data OR Create CMS Workspaces and Channels |
| To manage channel settings: | A CMS workspace contributor role of content admin |
Create a CMS Channel
Create a channel from the CMS Channels tab or from a CMS workspace. Create public or restricted channels, depending on where you want your content to be available. You can also create a channel to use Salesforce CMS content with the Salesforce B2C Commerce Page Designer.
- In Lightning Experience, from the App Launcher, open the Digital Experiences app.
- To create a channel from a CMS workspace or enhanced CMS workspace, on the Digital
Experiences Home tab, find the workspace in the all CMS workspaces list, and click the
workspace name.
- In a CMS workspace, click Channels | Add Channel | New.
- In an enhanced CMS workspace, click
 | Channels | Manage Channels | New.
- To create a CMS channel from the CMS Channels tab:
- Click
 (1),
and click CMS Channels (2).
(1),
and click CMS Channels (2). 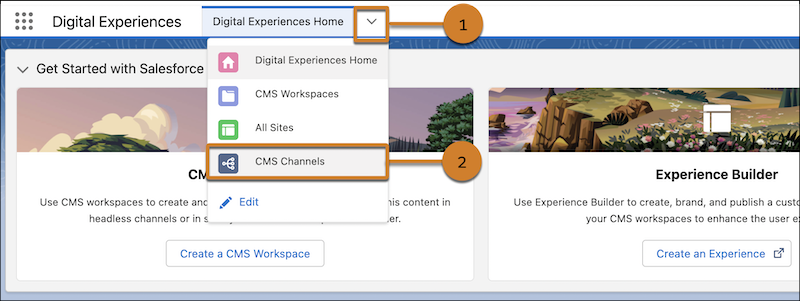
- Click Create Channel.
- Click
- Choose the type of channel that you want to create.
- To create a channel with publicly available content, click Public.
- To create a channel with content that’s restricted to specific users, click Restricted.
- To use Salesforce CMS Content with the Salesforce B2C Commerce Page Designer, click B2C Commerce Page Designer.
- To create a Public channel:
- Enter a name, set the cache duration for images and documents and for other CMS content types, and click Next.
- Configure domain settings, and click Next.
- To allow non-enhanced APIs to access published content from enhanced and non-enhanced workspaces, enable the Use non-enhanced APIs setting.
- If you enable the Use non-enhanced APIs setting, you can choose to enable search. Search works only with non-enhanced APIs.
- Click Done.
- To create a Restricted channel:
- Enter a name, select a permission set, and click
Next.The selected permission set has read-only access to the content in Salesforce CMS workspaces that it’s connected with.
- To allow non-enhanced APIs to access published content from enhanced and non-enhanced workspaces, enable the Use non-enhanced APIs setting.
- If you enable Use non-enhanced APIs, you can choose to enable search. Search works only with non-enhanced APIs.
- Click Done.
- Enter a name, select a permission set, and click
Next.
- To create a B2C Commerce Page Designer channel:
- Enter a name, and click Next.
- Enable search, and click Done.
If you haven’t already done so, make your Salesforce CMS content available to this new channel by adding the channel to a CMS workspace.
Edit a CMS Channel
Edit your CMS channel settings, such as cache duration or search settings, anytime after you create the channel. Depending on the channel type, some settings aren’t available for edit.
- From the Digital Experiences app, click , and click CMS
Channels.
- Find the channel that you want to edit in the All CMS Channels list, and from the dropdown menu, click Edit.
- Customize the channel settings, and save your changes.
Delete a CMS Channel
Before you delete a channel, you must remove it from all enhanced CMS workspaces. If the channel is connected to a non-enhanced workspace, you can’t remove it, and you can’t delete it. You can remove LWR and Aura site channels from enhanced CMS workspaces, but you can’t delete those channels.
- From the Digital Experiences app, click , and click CMS
Channels.
- Find the channel that you want to delete in the All CMS Channels list, and from the
dropdown menu, click Delete.
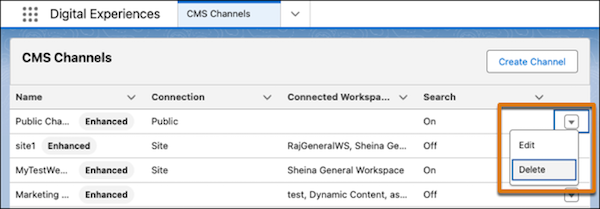
- Confirm that you want to delete the channel.If you must restore the channel, you can do so from your org’s Recycle Bin.
