
You are here:
Export and Import Content with Salesforce CMS
Get an overview of how to add content to a CMS or enhanced CMS workspace, or transfer content from one org to another. Learn more about how to format and handle content in some common use-case scenarios.
Required Editions
| Available in: Lightning Experience |
| Available in: Enterprise, Performance, Unlimited, and Developer Editions |
You can create original content piece by piece in the Digital Experiences app, but content import makes it easy to populate your workspace with content from another source. Define content details and create image references with JSON files, and choose to publish all content after import at once. Move content from one workspace when you export content as JSON files in a .zip archive, then import the .zip archive to a workspace in another Salesforce org.
Export and import of content works differently in a CMS workspace than it does in an enhanced CMS workspace. In a CMS workspace, you can include multiple content items in a single JSON file for import, whereas in an enhanced CMS workspace, each content item must be defined in its own content.json file. Learn more about what to do for these common use-case scenarios.
Export Content from a CMS Workspace
When you export from a CMS workspace, each piece of content formats in an individual JSON file included in a .zip archive.
During export the content details for each content item export to individual JSON files in a .zip archive. All media content exports to a separate .zip archive, and all other content exports to another. For example, when news content references a banner image, the banner image and the news content export to separate .zip archives such as 1-media-content-[jobId].zip and 2-content-[jobId].zip.
Export Content from an Enhanced CMS Workspace
You can export one or more content items at a time from an enhanced CMS workspace. Each content item is exported into a folder and uses the content key as the folder title (1). The content property definition appears in an individual content.json file. These folders and files compress into a .zip archive.
The Digital Experience app considers the content types image and document as media, and handles export and import of these content types differently. For instance, all media content selected for export is compressed into one or more .zip archives named 1-media-content-[jobId].zip.
All other content types selected for export are compressed to one .zip archive named 1-content-[jobId].zip. For example, when news content references a banner image, image content exports to the 1-media-content-[jobId].zip and the news content exports to the 1-content-[jobId].zip.
The media or content .zip archives organize the exported content into folders that contain JSON files of the content properties, metadata, and translation variant definitions.
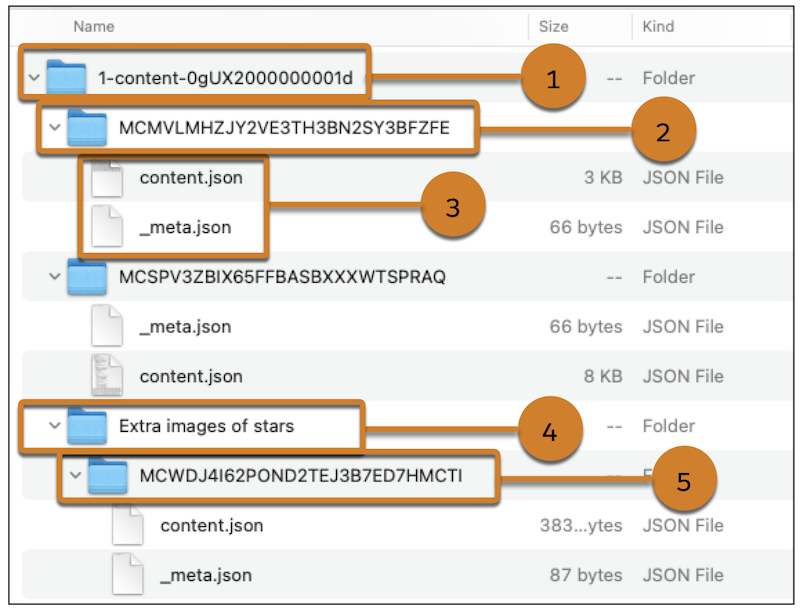
Within the 1-content-[jobId] folder (1), each content item is in a folder named after its content key (2). Within that folder is a content.json file (3), which defines the content item in JSON format. The content key and any folder paths for the content item appear in the _meta.json file. Workspace folders are also included in the export and maintain their title from the workspace (4). However, in the 1-content-[jobId] folder, the content item in the workspace folder appears in another folder named after its content key (5).
Import Content After Export
When you import the .zip archives into a CMS workspace or an enhanced CMS workspace, import the media .zip archive first, then import the corresponding content export .zip archive.
Import Content from an External Source
Transfer content from an external source or CMS, or mass-import images from an external digital asset manager (DAM) to a CMS workspace or an enhanced CMS workspace.
For a CMS workspace, first prepare your content for import by creating JSON files that describe the content. Then add the JSON files to a .zip archive.
You can include various content types in the same JSON file and import up to 5,000 items at the same time. If the .zip archive contains over 5,000 items, none of them are imported into the workspace.
For an enhanced CMS workspace, prepare your content for import by creating JSON files that describe the content and file paths. Then compress each content.json file to a .zip archive. Include one content item in each content.json file. For image and document content types, create a top-level folder and add the content.json. Then add a folder named _media, and add the media source file to that folder. Create a .zip archive of the top-level folder.
Import Local Files to a CMS Workspace
To import local files, such as
documents and images, create a folder named _media, then add the local
content files. When you enter the content details into a JSON file, use the ref attribute to reference the local image or document
filename and its location inside the _media folder. For example, if an
image is called salesforce21.png and is nested in a folder called Level 2, add the reference as
Level1/Level2/salesforce21.png.
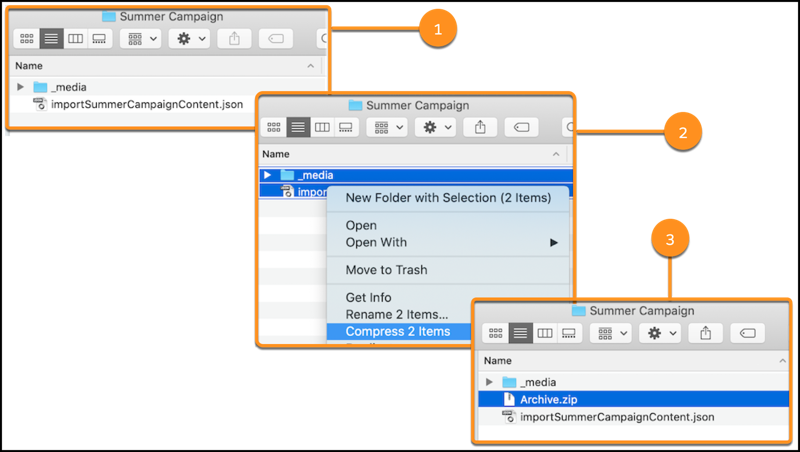
Add the _media folder to the location of the JSON files and create a .zip archive. For example, the _media folder and the JSON file are at the root level of a folder named Summer Campaign (1). Then create a .zip archive of the _media folder and JSON file (2). The .zip archive of the _media folder and the JSON file is in the root of the folder (3).
Import Local Files to an Enhanced CMS Workspace
To import local media files, such as documents and images, create a folder with any name. Inside that folder, create a folder named _media, then add the local content file. Enter the content details into a JSON file name, and save the file to the top-level folder as content.json.
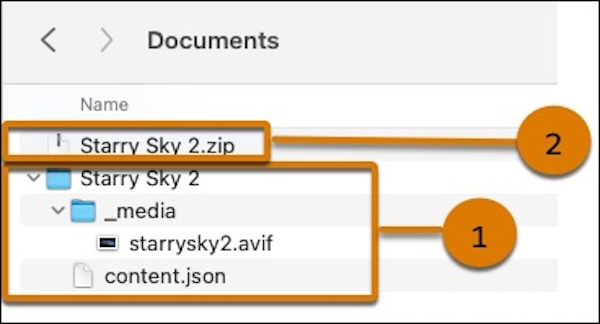
Create a .zip archive of the top-level folder. For example, the _media folder and the content.json file are in a folder named Starry Sky 2 (1). Create a .zip archive of the Starry Sky 2 folder (2), then import that .zip archive into your enhanced CMS workspace.
Import Content with References to Other Content
When one content item references another, import or add the referenced item into a CMS workspace or an enhanced CMS workspace before you import the content that references it. For example, if a news item references an image, ensure that the image is in the workspace so that the news item can reference the image’s content key. Or, after export, import the media .zip archive first, then import the corresponding content export .zip archive.
Bulk Publish After Import
To bulk publish content after import, import content in a CMS workspace or an enhanced CMS workspace. Then select Publish content after import to change the status of all the content in your import to published. If the content is already in your workspace, it replaces your last published version. The published content is immediately available to use in all channels, updated in your live site, and in all content references.
Considerations for CMS Collection Components
CMS Collection components aren’t included when you import or export in Salesforce CMS. Recreate your CMS Collection in the CMS destination org. If you use the same name for the collection, it’s not necessary to add it to the component again after you recreate it. CMS Collection components retain content references when you use the same name for the collection.
- JSON File Format for Content in Salesforce CMS
Understand the content details from an export, then define your content details in JSON format to import content into a CMS workspace. - JSON File Format for Content in an Enhanced CMS Workspace
Understand the content details from an export, then define your content details in JSON format for import. The export and import process works differently in enhanced CMS workspaces than it does in CMS workspaces. In enhanced CMS workspaces, each content item must have its own content.json file. Optionally, to specify the content key and folder placement of each content item, include a _meta.json file for each content.json. - Export Content from Salesforce CMS
Export content, such as images, news, documents, or custom content types to .zip archives of JSON files and media files from a CMS workspace or an enhanced CMS workspace. Transfer content from sandbox to production, or one org to another by importing the exported .zip archive. - Import Content into Salesforce CMS
Import images, news, documents, or custom content types into a CMS workspace or an enhanced CMS workspace by uploading a .zip archive of JSON files. Transfer content from an external source or CMS, or mass-import images from an external digital asset manager (DAM), for product enrichment.