
You are here:
Create and Customize Retention Policies for Data and Storage
Use the Retention Policies feature to create policies that copy customer data and store it. You can also make PII anonymous in your org and in the data retention store. Or, you can delete data from your org when it copies to the retention store. Choose to anonymize fields or records by replacing them with random characters or mock data.
Required Editions
| User Permissions Needed | |
|---|---|
| To create and use Retention: | ModifyAllData and PrivacyCenter |
- From the Privacy Center dashboard, under Retention Policies, click View All.
- Click New, then enter a name for your policy. The name must be alphanumeric with no spaces or special characters. Optionally, add a description for your policy.
- Click Save & Edit.
- Under Settings, select a frequency for the policy to run at.
- Run Once (Now): The policy immediately runs one time when you click Run.
- Run Once (Scheduled): The policy runs one time at the date and time you indicate.
- Daily: The policy runs every day at the same time and starts on the date and time that you indicate.
- Weekly: The policy runs one time a week on the day and time that you indicate.
- Monthly: The policy runs one time a month on the day and time that you indicate. If your selected day isn’t valid for a specific month (for example, February 29), Privacy Center uses the last valid day of that month (February 28).
- Yearly: The policy runs one time a year on the day and time that you indicate.
- Select a Start Date and Time.
- Under Objects & Fields, choose an object to run the policy on. You can only run
retention policies on supported objects. Change the object in the policy to
Active.
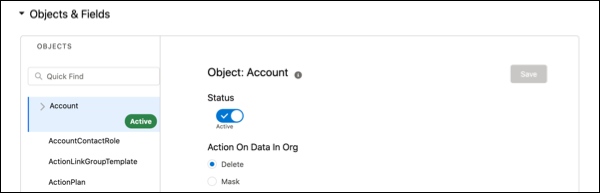
Policies run on active objects only. If you create a policy and later determine that you don’t want to include an object, switch the object to Inactive.
- Under Action on Data In Org, choose to delete or mask the data. If you choose to delete,
the original record and data are deleted from your org and only the data in fields marked
Retain moves to storage. If you choose to mask, the original data moves to storage, and you can
indicate how the data for each field is masked in your org in Step 9.
 Note Only data in your Salesforce org is masked. The data in your Heroku data store remains untouched.
 - Optionally, you can add data filters to your object to capture fields that meet certain
criteria. For example, apply a filter so that your policy captures only the data that’s created
in the object after a specific date. Conditions created translate into a WHERE clause that
filters the data retrieved during execution in Heroku.
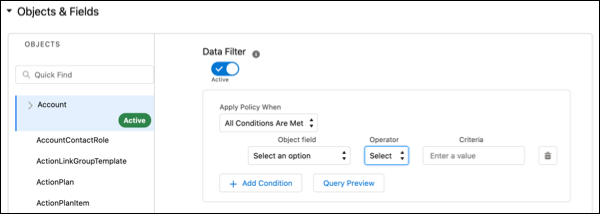 Note When you apply a filter to a parent object, only the child records of the filtered parent records are affected. For example, if you set a filter that captures only the data created for an object after a specific date, only child records of the parent that are created after the specific date are processed.
 - For each field, select a Delete or Mask option.
- If you chose Delete for Action on Data in Org, at the field level choose Retain to move the original data into storage. Or leave the option blank to permanently delete the data. Some fields must be retained and automatically populated.
- If you chose Mask for Action on Data in Org, at the field level choose from four options. Choose Delete to remove the data from your org and save a copy in storage. Choose Replace from Library to replace the data in your org with fake data. Choose Replace with Random Characters to replace the data in your org with random values.
- Optionally, check the box next to Unique to add the record’s Salesforce ID to the
field value. This option creates a globally unique value for the record that’s saved in
storage. With the Unique Value checkbox, values are truncated to meet the max length of
the field. For example, a value of ABCDE appended with an Id of 005E0000004fQu7 becomes
ABCDE005E0 to maintain the max field length of 10. Selecting this option increases
overall run time.
Any field with compliance categorization metadata is marked with an orange triangle. To display details on the related compliance category, hover over the triangle.
- Save your work after you edit the object.
- In the Objects column, expand the dropdown list under your object to select any child
objects that you want to include in the policy. Make selections on the child object, then save
your work.

- After you edit your policy, click Activate.
Did this article solve your issue?
Let us know so we can improve!