
You are here:
How to Implement Embedded Login
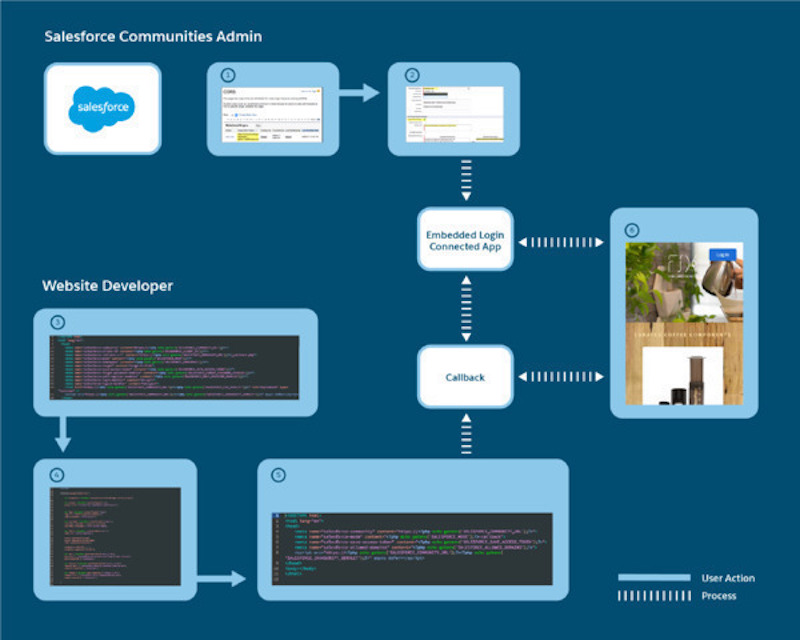
Adding Embedded Login to a web page requires coordination between the Salesforce admin who manages the Experience Cloud site and the web developer who builds the web page.

Warning In Summer ’24, Salesforce made Embedded Login disabled by default. We
recommend that you use the web server flow, the user-agent flow, or another
redirect-based OAuth 2.0 flow instead of Embedded Login.
Embedded Login relies on third-party cookies, which are blocked or restricted in most browsers. And Embedded Login works only on Google Chrome and only as long as third-party cookies are allowed there by default.
Who Does What
- The Salesforce admin:
- Configures the authentication providers, creates a site, applies a login page type, and brands the login page (1).
- Adds the website domain to the Cross Origin Resource Sharing (CORS) allowlist (1).
- Creates an Embedded Login connected app. The connected app handles the interaction between Salesforce and the website (2).
- The web developer:
- Adds Embedded Login meta tags to the web page to display the login form (3).
- Supplies JavaScript functions and the
onloginandonlogoutspecifications to determine what happens when the user logs in and out. The logout function is optional. (4). - Adds the connected app’s callback URL to handle the authorization response, specifying specific meta tags (5).
The result is a web page with login capabilities (6).
What’s Happening Behind the Scenes
- When a user clicks the Log In button and enters credentials in the login form, Salesforce authenticates the user. Then Salesforce checks the connected app to determine the permissions to grant with the access token.
- Salesforce sends the access token with its associated permissions and custom attributes to the callback URL.
- The callback URL uses the access token and permissions to determine what data the user can access. It also pulls the user’s information from Salesforce and caches it locally.
- The
onloginfunction determines which information to display to the user. - If the website requires ongoing interaction with Salesforce after authentication and authorization, the connected app maintains a connection between the web page and the Salesforce site.
Did this article solve your issue?
Let us know so we can improve!
