
Use API Keys in Custom Headers with Named Credentials
Web services often define their own authentication protocols using custom headers. For those cases, you can create a custom header for a named or external credential and use API keys as a password.
Required Editions
| Available in: both Salesforce Classic (not available in all orgs) and Lightning Experience |
| Available in: all editions |
The named credentials schema includes support for authentication protocols like OAuth 2.0
and AWS Signature v4. Some web service providers have their own authentication protocols
that use unique headers for authentication. In these cases, choose a Custom authentication protocol for your external credential,
and use a custom header to authenticate to such systems.
One common approach used by web service providers for custom authentication is API keys. Besides authentication, API keys can also be used for various HTTP-related services, such as caching or cookies. For named credentials, you can create a custom header that uses API keys as an authentication protocol, with the key’s secret value functioning as a password.
Each web service can name its headers arbitrarily. Common names include ACCESS_TOKEN, bearer,
Client-ID, developer-token, and X-API-Key.
For the HTTP 1.x standard, a call using a (hard-wired) API key can look something like this.
GET https://example.com HTTP/1.1
Client-ID: abc123
Here the API key Client-ID is also the name of the
header, and abc123 is the value of the API key used for authentication. The name and
the value are set by the authenticating system. Typically, you retrieve these parameters
through the external system’s UI.
The HTTP standard includes an Authorization header for
authentication. By default, Salesforce named credentials use this standard authorization
header. However, you can override the default and create a custom Authorization header. This
example shows the Authorization header used with an API
key.
GET https://example.com HTTP/1.1
Authorization: Client-ID abc123
The general steps to use API keys with named credentials are:
- Create an external credential, setting the Authentication Protocol to Custom. An external credential stores authentication and authorization information and is used by named credentials.
- Store the API key as an authorization parameter in a principal.
- Create a custom header for the external credential. The header references the API key.
- Create a named credential that references the external credential.
Store an API Key as an Authentication Parameter in a Principal
We strongly recommend storing API key authentication parameters as part of an external credential principal.
The API key is a secret value. Authentication parameters are expected to contain secrets and are stored in an encrypted manner consistent with other sensitive information. Additionally, access to the secrets is granted explicitly using a principal.
A principal links an external credential to permission sets and profiles. By adding authentication parameters to a principal, you enable different groups of Salesforce users to use different authentication tokens to call the same external service.
- Create an external credential and set the Authentication Protocol field to
Custom. For instructions on creating and configuring external
credentials, see Create or Edit a Custom Authentication External Credential. In this example, the external credential is
named
MyCustAuthExternCred.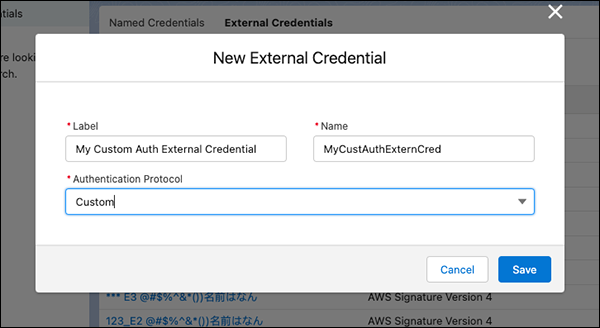
- On the external credential’s page, scroll to Principals.
- To create a principal, click New, and set these fields.
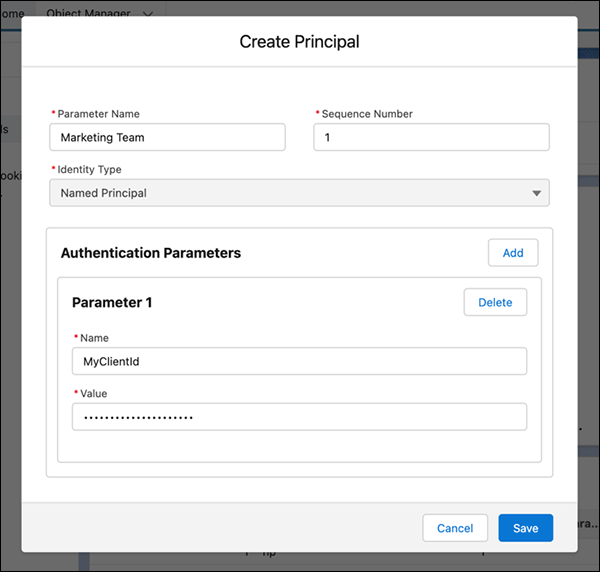
- Parameter Name
- A name for the principal, such as Admin or Marketing Team.
- Sequence Number
- This number determines which mapping is used for the callout, sorted from lowest to highest. Set the sequence number in case a user has multiple permission sets used in multiple principals.
- Identity Type
- Custom authentication uses the Named Principal identity type. Named Principal indicates
that Salesforce users share one API key, and they don’t have unique access to the external
service. You can’t change the identity type for Custom authentication.
 Note At this time, only the OAuth protocol supports unique per-user access to a remote system. In that case, each user logs in separately before the integration works in their user context.
 - Name
- The name for the authentication parameter. In this example, the name is
MyClientId. - Value
- The API key value. In many cases, you get the API key from the web service’s UI.
- Map the principal to a permission set or profile. See Enable External Credential Principals. You can map a principal to multiple permission sets, permission set groups, or profiles.
Use API Keys in a Custom Header
After you add API keys to a principal, you can use those keys in a custom header.
- On the external credential that you created, scroll to Custom Headers and click New.
- Fill in the fields for the custom header.
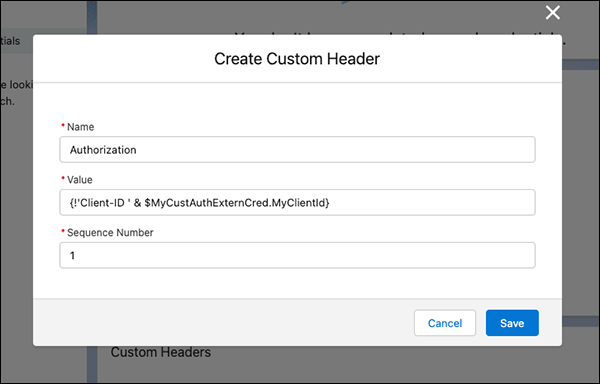
- Name
- The name of the standard HTTP request header as required by the external service. In this case we’re performing authentication, so we use the HTTP standard name Authorization.
- Value
- The API key name and value. It can be a literal or a programmatic expression.
- The value can be expressed programmatically with merge fields and formulas. For instance,
the value can take this
form.
{!'Client-ID ' & $Credential.Container.ParameterName} - In this example, the literal string
Client-IDis concatenated with the API key, and the expression resolves as:{!'Client-ID ' & $Credential.MyCustAuthExternCred.MyClientId} - Formulas can be used in header values via the
{!FormulaGoesHere}syntax. Anything inside{!}is evaluated as a Salesforce formula. Formulas provide significant power and flexibility to craft header values without coding. - Merge fields provide access to encrypted values via the
$Credential.Container.ParameterName syntax. In this example Container is the external credentialMyCustAuthExternCred. ParameterName is the principal authentication parameterMyClientId, which was mapped to the API key value. - Sequence Number
- This number determines which header “wins” and gets used for the callout, sorted from lowest to highest. If you’re not worried about collisions with other headers, leave this field as the default.
The external credential now shows the custom header with a reference to the authorization parameter that contains the API key.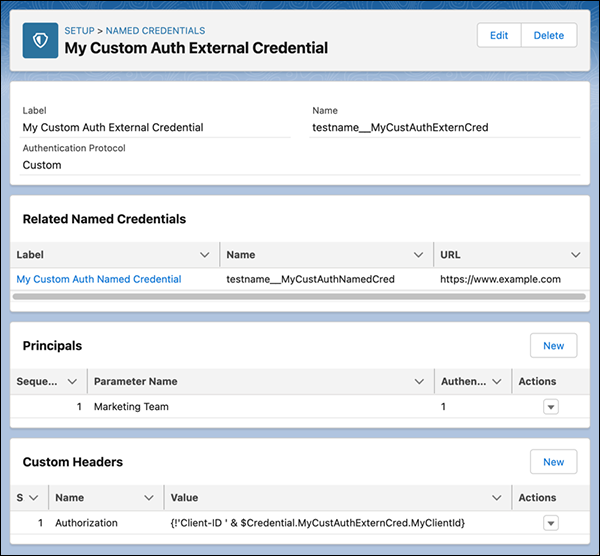
If Client-ID is abc123, the resulting callout
looks like this. The named credential appends Authorization: as the header
name.
GET https://example.com HTTP/1.1
Authorization: Client-ID abc123Use API Keys with a Named Credential
After you’ve created an external credential that uses API keys, it can be referenced by a named credential.
- Disable Generate Authorization Header in the named credential.
Disabling this option ensures that the named credential uses the custom
Authorizationheader that you created. - In that named credential, make sure that Allow Formulas in HTTP Header is enabled.
A callout using this named credential returns successfully because it has the correct
Authorization header. If the tokens expire or the URL
changes, no changes to Apex code are needed. In addition to Apex, the credential can be used
in no-code tools such as External Services that provide integration with Flow.