
Use Custom Headers for Basic Authentication with Named Credentials
Create an external credential with a custom header that uses HTTP Basic authentication.
Required Editions
| Available in: both Salesforce Classic (not available in all orgs) and Lightning Experience |
| Available in: all editions |
The named credentials schema includes support for authentication protocols such as OAuth
2.0 and AWS Signature v4. Some web service providers, however, have their own authentication
protocols that use unique headers for authentication. One such protocol is the HTTP Basic
authentication scheme, a simple username-password protocol. To connect to an external
service using Basic authentication, choose a Custom
authentication protocol for your external credential, and use a custom header to
authenticate.
The HTTP Basic authentication scheme uses the Authorization HTTP header, along with a username and password combined using
base64 encoding. The username and password are concatenated with a colon (:), then
encoded.

For example:
myUsername:myPassword → base64 encoding → bXlVc2VybmFtZTpteVBhc3N3b3JkCg==The username and password can be similarly decoded.

Example:
bXlVc2VybmFtZTpteVBhc3N3b3JkCg== → base64 data decoded → myUsername:myPasswordThe Basic system encodes the username and password, but it doesn’t encrypt them. Because the username and password can be decoded by anyone who encounters them, the Basic authentication scheme is only secure when used with SSL encryption (HTTPS/TLS).
The encoded Basic data goes in the Authentication
header as follows.
GET https://example.com HTTP/1.1
Authorization: Basic bXlVc2VybmFtZTpteVBhc3N3b3JkCg==
Create a Custom Header for Basic Authentication
Both named and external credentials can have custom credentials. To create a custom header for Basic authentication, use an external credential.
Here’s a general outline of how to use named credentials with a custom Authorization header that uses Basic authentication. For more on
how to create external credentials with custom headers, see Create or Edit an External Credential.
- Create an external credential. Give it a name such as BasicAuth.
- Set the credential’s authentication protocol to Custom. Save the external credential.
- Scroll to Principals and click New. The new principal automatically has an identity type of Named Principal, which can’t be changed.
- Enter a Parameter Name, such as Admin or Marketing Group.
- Optionally, enter a sequence number.
- Under Authentication Parameters, click Add to add a parameter, for
example
Username. Set the value to the username you use for the web service provider. Click Add again to add another parameter, for instancePassword, and set it as the password you use for the web service provider. Note Some systems don’t use passwords for Basic authentication. For example, when authenticating to GitHub, you use a personal access token instead of your user password.
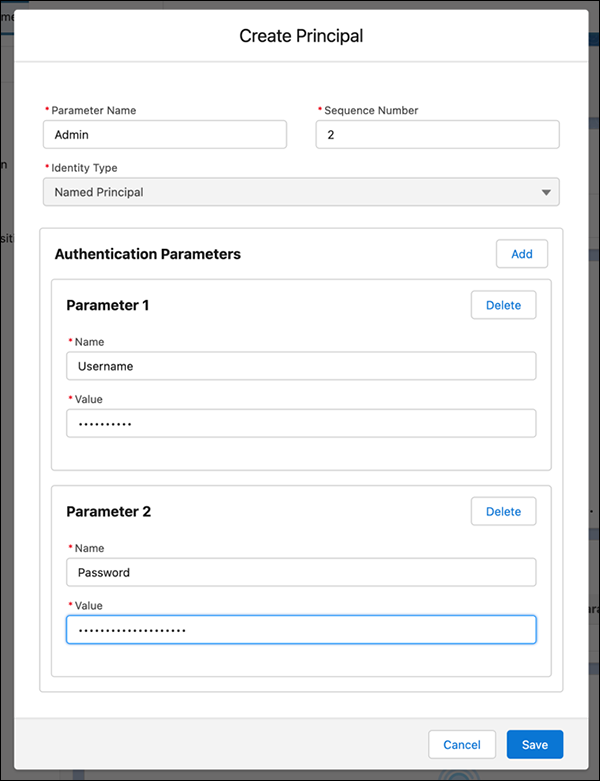
- Save the principal.
- Now create a custom header with a formula for an encoded Basic username-password combination. See Create and Edit Custom Headers. On the external credential, scroll to Custom Headers and click New.
- Enter Authorization as the name of the custom header.
- For Value, enter:
{!'Basic ' & BASE64ENCODE(BLOB($Credential.externalCredentialName.Username & ':' & $Credential.externalCredentialName.Password))}where externalCredentialName is the name of the external credential you created (’BasicAuth’ in this example).
Base64 encoding is often used to convert binary data to a text string for easier transfer between systems. Binary data stored in some databases is sometimes referred to as a Binary Large OBject (BLOB). Two formulas,
BLOBandBASE64ENCODE, used together, take the secret values, treat them as binary data, and then encode that binary data with base64. For more on formula functions likeBASE64ENCODE, see Use Named Credential Formula Functions in Custom Headers. - Set the sequence number as desired, or leave the default.
- Save the custom header.
Use Basic Authentication with a Named Credential
After you’ve created an external credential that uses custom headers with Basic authentication, link it to a named credential.
These steps describe the general process of linking Basic authentication to a named credential. For full instructions on creating and editing named credentials, see Create or Edit a Named Credential.
- From Setup, in the Quick Find box, enter Named Credentials, and then select Named Credentials.
- Create a new named credential or select an existing one.
- Disable Generate Authorization Header in the named credential.
Disabling this option ensures that the named credential uses the custom
Authorizationheader that you created. - In the named credential, be sure that Allow Formulas in HTTP Header is enabled.
- Enter the name of the external credential that uses Basic authentication.
- Save the named credential.
A callout using this named credential returns successfully because it has the correct Authorization header. If the tokens expire or the URL changes, no
changes to Apex code are needed. In addition to Apex, the credential can be used in no-code
tools like External Services that provide integration with Flow.