
You are here:
Create Interface Objects for a Data Mapper Load
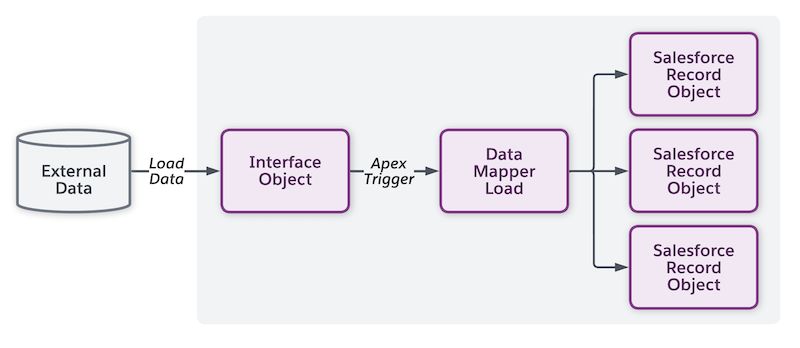
Provide external data, such as a CSV file, as an input to a Data Mapper Load. The external data can be imported into an interface object, which is a custom Salesforce object using a data import tool. Then, map the fields from the custom object to the target Salesforce records using a Data Mapper Load. When you load data to a Salesforce custom object, it fires an Apex trigger that calls a Data Mapper Load. The Data Mapper takes data from the interface object and writes the resulting data to other Salesforce record objects.
You can load data to a Salesforce custom object by using Salesforce's Data Import Wizard or a tool such as the Salesforce Data Loader, Informatica, or Talend.
-
In Salesforce, create a custom object and add fields corresponding to the data in the
external source.
-
Add these string fields to the custom object:
- DMError (Data Type: Long Text Area)
- DMProgressData (Data Type: Long Text Area)
- DMName (Data Type: Text): This field is required.
 Note
NoteIn Omnistudio for Managed Packages, DRBundleName is a required field.
- DMStatus (Data Type: Long Text Area)
These fields are reserved by Data Mappers for internal use.
- Add fields corresponding to the data in the external source.
-
Add these string fields to the custom object:
-
Create an Apex class
DMInterfaceObjectFuture.- From Setup, find and select Apex Classes.
-
Create a new Apex class and add this code.
public class DMInterfaceObjectFuture {
@future(callout=true)
public static void call(String sObjectIdsAsString){
List<String> sObjectIds = (List<String>)JSON.deserialize(sObjectIdsAsString, List<String>.class);
ConnectApi.DataMapperInterfaceObjectInput input = new ConnectApi.DataMapperInterfaceObjectInput();
input.interfaceObjectIds = sObjectIds;
input.interfaceObjectAPIName = String.valueOf(((Id)sObjectIds.get(0)).getSObjectType());
ConnectApi.DataMapperInterfaceObjectConnect.executeDataMapperLoadForInterfaceObjects(input);
}
}
-
Create a new trigger on the custom object that invokes the Data Mapper Load.
trigger trigger_name on interface_object_api_name (after insert, after update) { String orgNamespace = [SELECT NamespacePrefix FROM Organization LIMIT 1].NamespacePrefix; String prefix = String.isEmpty(orgNamespace) ? '' : orgNamespace + '__'; List<String> sObjectIds = new List<String>(); for (sObject sObj : Trigger.new) { if (Trigger.isUpdate) { if (Trigger.oldMap.get(sObj.Id).get(prefix + 'DMStatus__c') != Trigger.newMap.get(sObj.Id).get(prefix + 'DMStatus__c') || Trigger.oldMap.get(sObj.Id).get(prefix + 'DMError__c') != Trigger.newMap.get(sObj.Id).get(prefix + 'DMError__c') || Trigger.oldMap.get(sObj.Id).get(prefix + 'DMProgressData__c') != Trigger.newMap.get(sObj.Id).get(prefix + 'DMProgressData__c') || Trigger.oldMap.get(sObj.Id).get(prefix + 'DMName__c') != Trigger.newMap.get(sObj.Id).get(prefix + 'DMName__c')) { continue; } } sObjectIds.add(sObj.Id); } if (!sObjectIds.isEmpty()) { DMInterfaceObjectFuture.call(JSON.serialize(sObjectIds)); } } -
Create and configure the Data Mapper Load.
- Create a Data Mapper Load with SObject as the input type.
- Select the interface object that you created for the input data from the dropdown list.
- In the Data Mapper Load, map the interface object fields with the Salesforce records that you want to update.
- To verify that your Data Mapper Load can access data in the interface object, load a small amount of test data into the interface object and run the Data Mapper.
-
Import the external data into the interface object by using the Salesforce bulk load
tool or your preferred bulk load tool.
You can now use interface objects in Data Mappers in the same way as standard Salesforce objects.
 Tip
TipIf you use interface objects regularly, rather than for a one-time bulk load, create a tab for the object to facilitate quick and easy access.
Create Interface Objects for a Data Mapper Load Example
-
Create an interface object
TestInterfaceObject__cwith these fields:- Data__c: This is the data field to add custom data.
- DMStatus__c
- DMError__c
- DMProgress
- DMName__c
-
Create a Data Mapper Load with the
TestInterfaceObject__cobject as the input that creates records of Account and Contact. -
Configure the Data Mapper Load mapping.
TestInterfaceObject__c.Data__ctoAccount.NameTestInterfaceObject__c.Data__ctoContact.LastName
-
Create a new record for
TestInterfaceObject__c.For example, when you add a new record, Account1, in the Data_c field of the interface object, a new Account record with Name = Account1 is created and a new Contact record with LastName = Account1 is created.These fields of the TestInterfaceObject__c object are updated:
DMStatus__c: {"Account": "success", "Contact": "success"}DMProgressData__c: {"Account": "<created account id>", "Contact": "<created contact id>"}