
You are here:
Reset Managed Package Features
Undo changes made to your Salesforce org by the Quip Setup Starter managed package.
Required Editions
| Available in: Lightning Experience |
Reset your Salesforce org and delete changes made by the Quip managed package.
Add the Account Plan
To remove the Quip Account Plan from your accounts, then deactivate the process.
If you chose to create an Account Plan when a new record is created, do the following:
- From the Quick Find box in Setup, enter Process Builder.
-
Select Quip - Account - Create Account Plan.

- Click Deactivate, then Confirm.
-
To delete the process, find the deactivated process and expand it, then click
Delete.

-
If you chose not to activate the record page later, do the following:
- From Setup, go to the Object Manager.
- Select the object that you embedded your Account Plan template in.
-
Click Lightning Record Pages, then the record page you
chose.
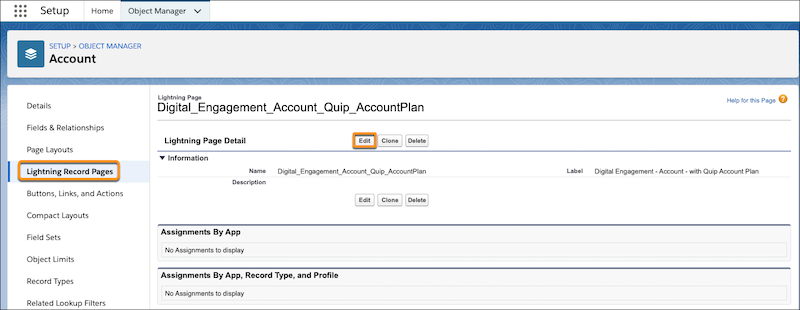
- Click Edit.
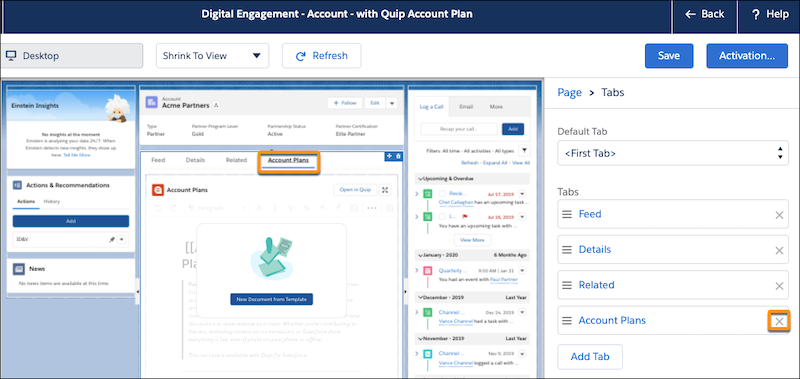
-
From the Lightning App Builder, click the Account Plan tab, and delete it. Click
Save.
- To delete the custom field, from Setup, go to the Object Manager.
- Select the object that you embedded your Account Plan template in.
-
Click Fields & Relationships and find the Account Plan
field.
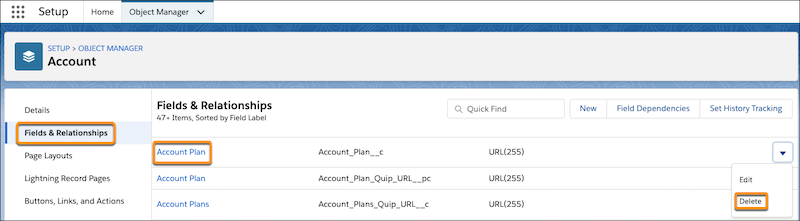
- Click Delete from the dropdown.
Add Opportunity Notes
To remove Opportunity Notes from your opportunities, follow the same steps as with the Account Plan deletion process but for the Opportunity object.
- Deactivate and delete the Quip - Opportunity - Create Opportunity Notes process.
- If you chose to activate the record page later, delete the record page with “with Opportunity Notes” added to it.
- If chose not to activate the record page later, delete the Opportunity Notes tab.
- Delete the Opportunity Notes custom field.
Add Custom Quip Document
To remove your custom document from your selected object, follow the same steps as with the Account Plan and Opportunity Notes deletion process but for your object and document.
- Deactivate and delete the Quip - [Object Name] - [Process Name] process.
- If you chose to activate the record page later, delete the record page with “with [Process Name]” added to it.
- If you chose not to activate the record page later, delete the custom tab.
- Delete the [Process Name] custom field.
Move Documents to Folder
To reset your document management, complete the following steps:
-
Deactivate the process.
- From the Quick Find box in Setup, enter Process Builder.
- Select Quip - [Object] Folder Organization (Trigger).
- Click Deactivate, then Confirm.
-
Delete the process. Find the deactivated process and expand it, then click
Delete.

-
Delete the custom field.
- From Setup, go to the Object Manager.
- Select the object you chose during the document management setup.
-
Click Fields & Relationships and find the Quip Folder
field.

- Click Delete from the dropdown.
-
Deactivate and delete the flow.
- From the Quick Find box in Setup, enter Flows.
-
Find the flow that ends with “Folder Organization” and click View
Details and Versions from the dropdown.
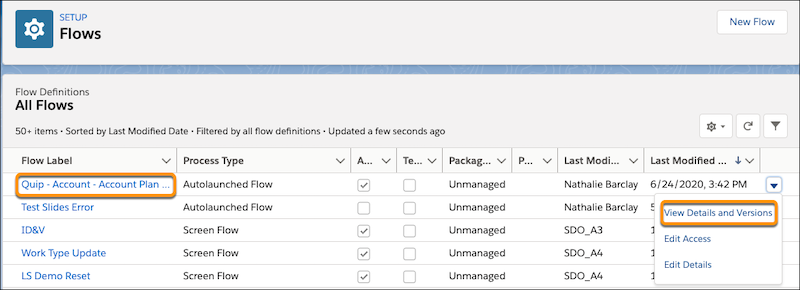
- Click Deactivate, then Delete.
-
Delete the folder.
- In Quip, go to your Private folder.
- Find the folder you specified during the setup and click Delete Folder from the dropdown.
Send Document Notifications
To stop automatic document notifications, complete the following steps:
-
Deactivate the process.
- From the Quick Find box in Setup, enter Process Builder.
- Select Quip - [Object] - [Condition] - Document Notifications .
- Click Deactivate, then Confirm.
-
Delete the process. Find the deactivated process and expand it, then click
Delete.
Set Up Live Data Feed
To revert the live data feed, complete the following steps:
-
Deactivate the process.
- From the Quick Find box in Setup, enter Process Builder.
- Select Quip - [Object] - [Condition] - Live Data Feed .
- Click Deactivate, then Confirm.
-
Delete the process. Find the deactivated process and expand it. Click
Delete.
