
You are here:
Automate Close Plans with Flow Builder
Save time manually creating and filling out Mutual Close Plans with templates in Flow Builder. Use Process Builder and Flow Builder to automatically add a Mutual Close Plan template to a record and generate an auto-populated Close Plan when the Opportunity stage changes. Add the copied document to a folder and send a message to @everyone to notify users that a document was created.
Required Editions
| Available in: Lightning Experience |
Use a flow to automatically populate a Mutual Close Plan attached to an Opportunity. After you create a document from the template, the flow moves the document to a folder and sends a message in the conversation panel. Process Builder then autolaunches the flow when an Opportunity stage changes to Proposal/Quote.

Set Up the Quip Document Component
Set up the Quip Document component on the Opportunity page layout. Create a Mutual Close Plan custom URL field to store Mutual Close Plans created from your template.
Required Editions
| Available in: Lightning Experience |
- Navigate to an Opportunity record in Lightning Experience.
- Click the gear icon, and select Edit Page to go to the Lightning App Builder.
- Create a new tab called Close Plan.
-
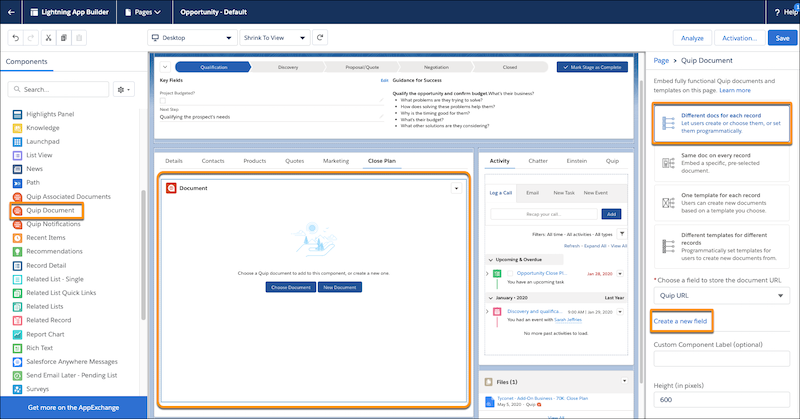
In the left pane, select Quip Document and drag it to your new
tab.
-
Select Different docs for each record.
 Note Different Docs for each record uses Flow Builder to add a template to a record. To use Flow Builder or let users manually add templates, select One template for each record.
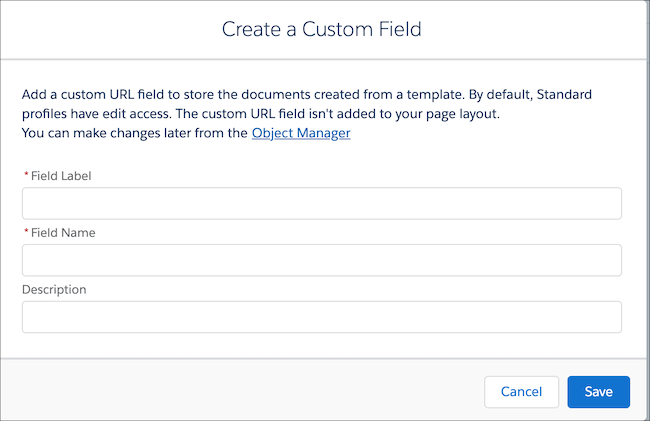
 - To create a custom URL field to store the new document URLs, select Create a new field.
-
Enter Mutual Close Plan as the field label and field name. You can
make changes later from the Object Manager.
- Save the action.
To add your Mutual Close Plan template to the Quip Document component and to automate Mutual Close Plan creation, create actions in Flow Builder and Process Builder.
Create a Mutual Close Plan
Use Flow Builder to add your Mutual Close Plan template to the Opportunity and to automatically populate Mutual Close Plans created from it.
Required Editions
| Available in: Lightning Experience |
- From the Quick Find box in Setup, enter Flows.
- Click New Flow.
-
Select Autolaunched Flow and click
Next.
Flow Builder displays the flow in the Auto-Layout flow layout. You can access Interactions, Logic, and Data via the plus icon.
Process Builder later launches the flow when an Opportunity stage is changed.
- Drag the Action element onto the canvas.
- Select Quip.
- Enter Copy Quip Document as the Quip action.
-
Name the action Create Mutual Close Plan from Template. To
auto-create the API name, press Tab.
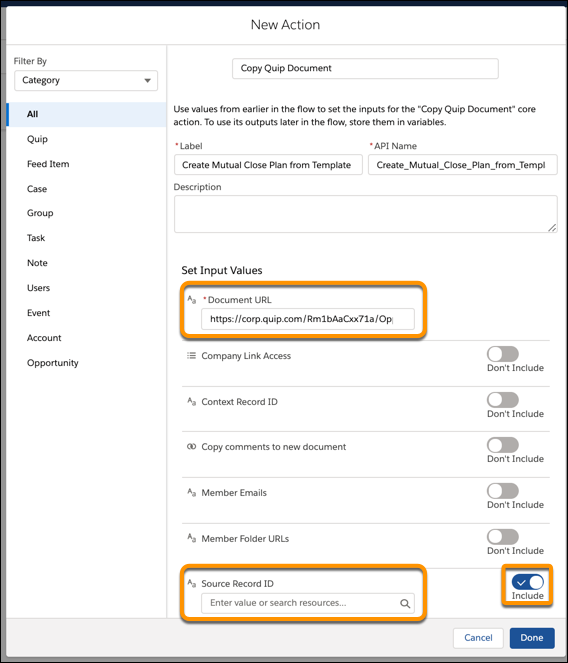
- Enter the Document URL for the Mutual Close Plan (https://quip.com/Rm1bAaCxx71a/OpportunityName-Close-Plan).
- Include the Source Record ID. Under Source Record ID, click + New Resource.
- Select Variable as the Resource Type.
- Enter the API name OpportunityRecord.
- Select Record as the Data Type.
- Select Opportunity as the Object.
- Select Available for input and click Done.
-
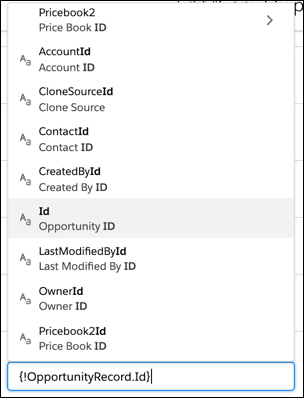
When you get the “Data type of the resource you entered isn’t compatible” error for the
Source Record ID, enter .id after OpportunityRecord. Select
Opportunity ID.
-
Select Manually assign variables. Under Store Output Values, click
Document Link and select + New Resource.
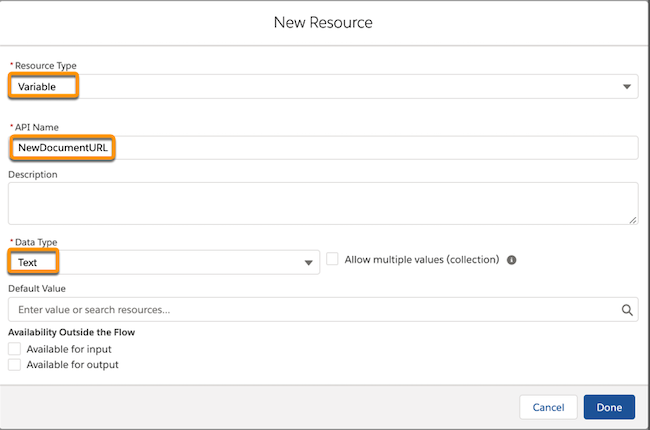
- Select Variable as the Resource Type.
- Enter NewDocumentURL as the API Name.
- Select Text as the Data Type. Click Done, then Done.
- Drag the Update Records onto the canvas.
-
Name the action Update Opportunity Record. To auto-create the API
name, press Tab.
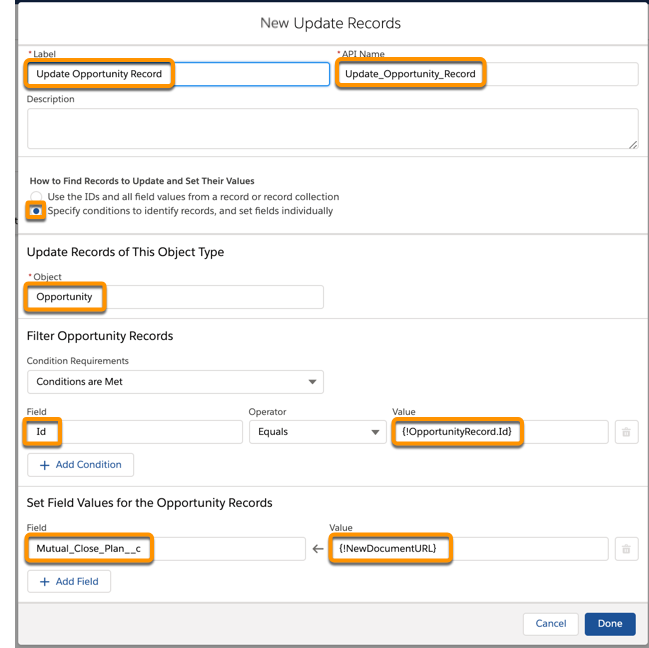
- Select Specify conditions to identify records, and set fields individually.
- Enter Opportunity as the Object.
- Under Filter Opportunity Records, enter Id as the Field, select Equals, and enter {!OpportunityRecord.Id}.
- Under Set Field Values for the Opportunity Records, enter Mutual_Close_Plan__c as the Field and {!NewDocumentURL} as the Value. Click Done.
-
Connect the elements and click Save.
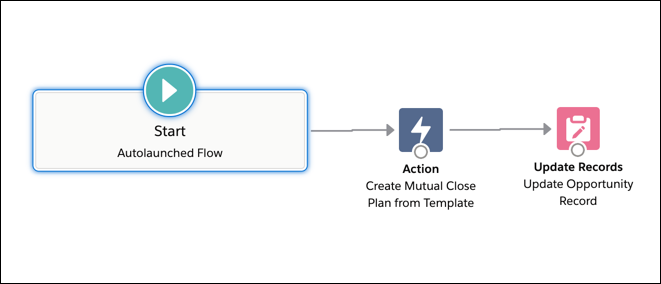
- Name the flow. For this example, we use the name Create Close Plan from Template. To auto-create the API name, press Tab. Click Save.
- Click Activate.
Trigger the Process
Create a process that launches the Mutual Close Plan flow when an Opportunity stage is changed to Proposal/Quote. When a user updates the Opportunity stage to Proposal/Quote, a Mutual Close Plan is created from the attached template and autopopulated based on the Opportunity’s data.
Required Editions
| Available in: Lightning Experience |
- From the Quick Find box in Setup, enter Process. Select Process Builder.
-
Click New.
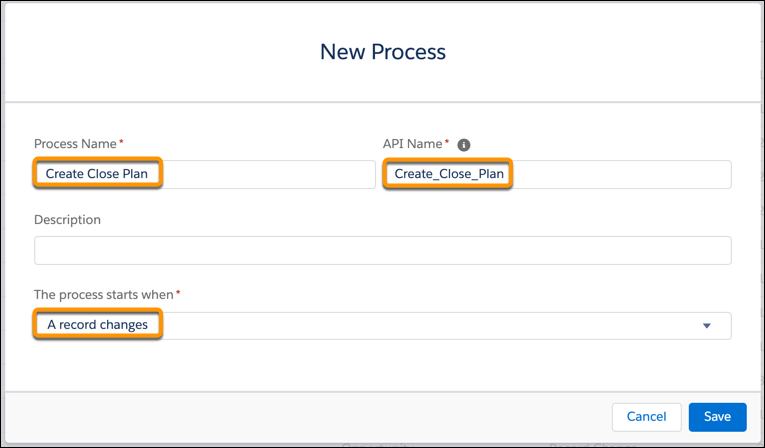
- Name the process Create Close Plan. To auto-create the API name, press Tab.
- Select A record changes as the process trigger. Click Save.
-
Click + Add Object and select Opportunity as
the object type.
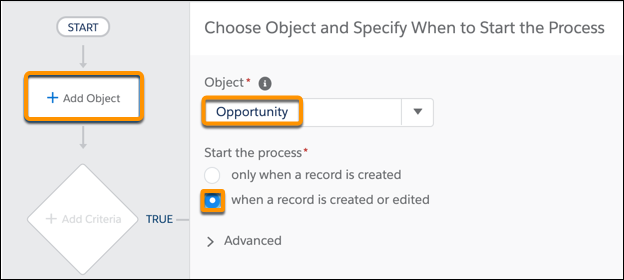
- Start the process when a record is created or edited. Click Save.
-
Click + Add Criteria.
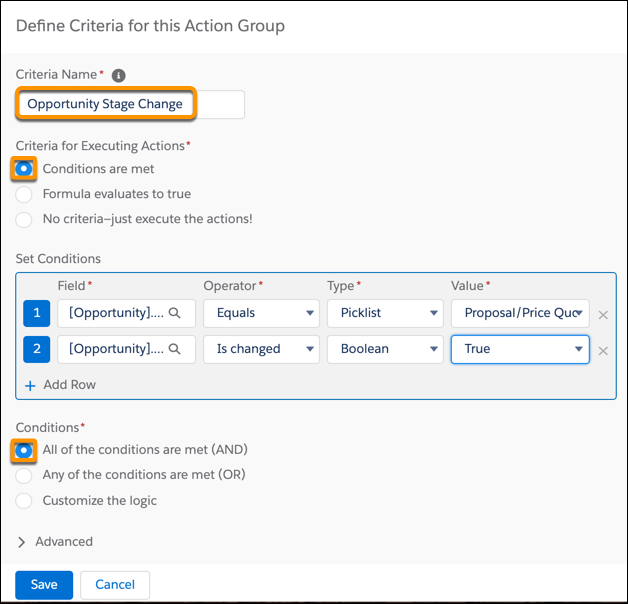
- Name the criteria Opportunity Stage Change.
- To determine when to trigger the process, select Conditions are met.
-
Set the conditions:
Field Operator Type Value [Opportunity]Stage Equals Picklist Proposal/Quote -
Click + Add Row and set conditions:
Field Operator Type Value [Opportunity]Stage Is changed Boolean True - Under Conditions, click All of the conditions are met (AND).
- Click Save.
-
Click + Add Action.
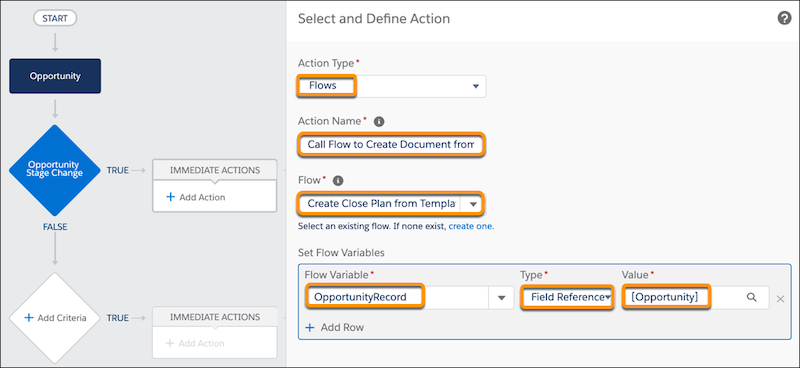
- Select Flows as the Action Type.
- Name the action Call Flow to Create Document from Template.
- Select the flow Create_Close_Plan_from_Template.
-
Set the flow variables:
Flow Variable Type Value OpportunityRecord Field Reference [Opportunity] - Click Save and then Activate.
When your users update an Opportunity stage to Proposal/Quote, a Mutual Close Plan is automatically created and data from the Opportunity is autopopulated. The created document is then stored in the Mutual Close Plan field added to the Opportunity layout.
Move and Share a Mutual Close Plan
To make it easier to manage your Mutual Close Plans, use Flow Builder to move Mutual Close Plans created from a template to a specific folder. Automatically send a message in the conversation pane to let users know that a document was created.
Required Editions
| Available in: Lightning Experience |
- In Flow, open the Create Close Plan from Template flow.
- Drag a new action onto the canvas after Update Records.
- Select Quip.
- Enter Add Quip Document to Folder as the Quip action.
-
Name the action Add Quip Document to Folder. To auto-create the API
name, press Tab.
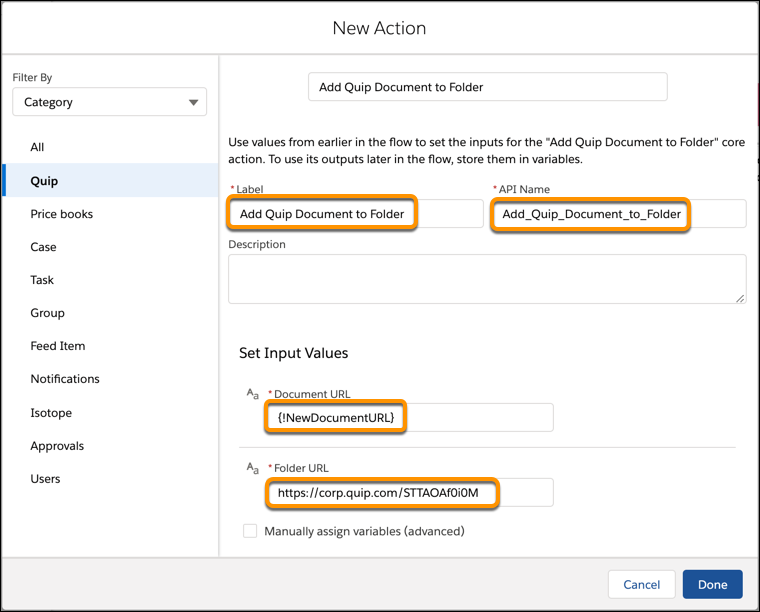
- For the Document URL, enter {!NewDocumentURl}.
-
To get the folder URL, first go to the Quip Admin Console.
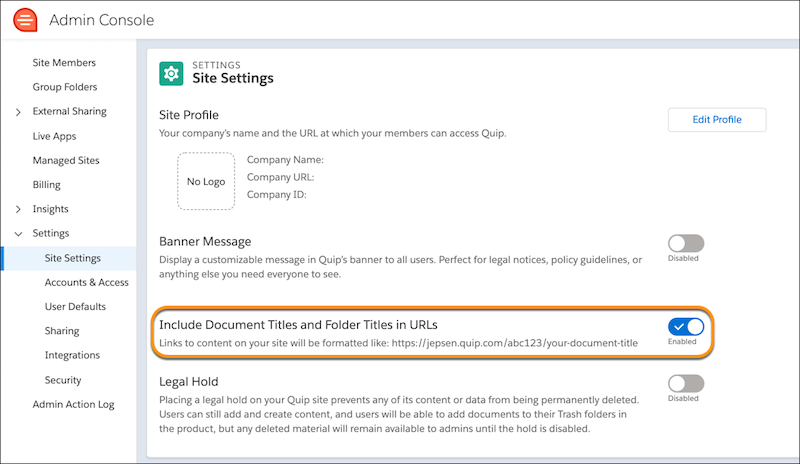
- Under Settings, click Site Settings.
- Disable Include Document Titles and Folder Titles in URLs.
- In Quip, go to the folder where you want to add Mutual Close Plans created from a template. Copy the folder URL.
- Paste the folder URL in the Flow Builder action and click Done.
- Connect the elements and click Save.
- To send a message alerting everyone that a document was created, drag a new action onto the canvas.
- Select Quip.
- Enter Send Message in Document as the Quip action.
-
Name the action Notify Everyone. To auto-create the API name, press
Tab.
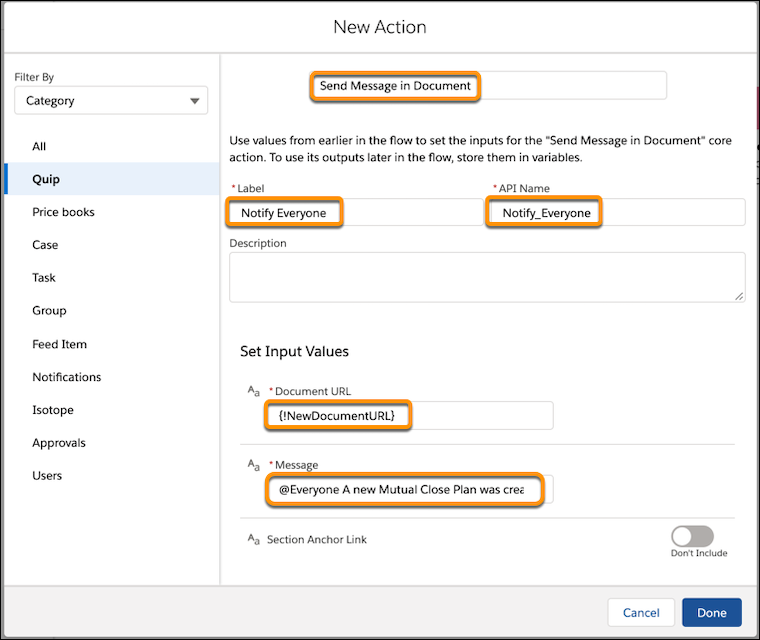
- For the Document URL, enter {!NewDocumentURL}.
- Enter a custom message. To make sure that everyone gets notified, include @everyone.
- Click Done.
-
Connect the last action. Click Save As and then
Activate.



Your flows and process are ready to go! To see them in action, go to an Opportunity page and change the stage to Proposal/Quote.
