
You are here:
Salesforce Output Connection
Push your prepared dataset data into any Salesforce org from Salesforce Data Pipelines Salesforce Output connector and Data Prep. With your prepared data back in Salesforce, you can integrate external data, apply the suite of Salesforce automation tools to act on the data, and allow non-Salesforce Data Pipelines users access to the data through reports and dashboards. External connectors require OAuth 2.0 for server to server communication.
As of Summer '27, the SOAP API login() call in SOAP API versions 31.0 through 64.0 will no longer be supported and no longer be available. For more information, see SOAP API login() Call in SOAP API Versions 31.0 Through 64.0 Is Being Retired.
The Username and Password authentication settings in external connectors will no longer be supported starting in Winter '27.
New external connectors require OAuth with Client ID and Client Secret for authentication. Existing connectors using Username and Password can still function if the SOAP API login() is enabled in your org permissions. However, if you need to update the credentials for an existing Username and Password connector, you must convert it to use OAuth settings.
Restricted API access isn't supported for Salesforce Output and External connectors. Enable the Use Any API Client permission for the user creating the connector. For more information, see Manage API Access.
Use the Salesforce External Connections to sync data from another Salesforce org to Salesforce Data Pipelines.
How the Salesforce Output Connector with Output Node Works
The Salesforce Data Pipelines Salesforce Output connectors allow you to write the outcome of a recipe to any Salesforce org for further analysis, business automation, and expanded access. After you configure an output connector to the Salesforce org, create a recipe using Data Prep. Add an Output node to the recipe, select the Salesforce Output connection, and configure the node with the object, mapping, and other settings. When the recipe runs, Salesforce Data Pipelines can INSERT, UPDATE, or UPSERT the output dataset to supported objects.
Set Up an External Client App for OAuth
External client apps (ECA) provide single sign-on (SSO) and use OAuth protocols to authorize external connections.
- To create an ECA for your organization, from the Salesforce Setup page, enter External in the Quick Find box, and then select External Client App Manager.
- Click New External Client App.
- Enter the basic information.
- Enter the name for the ECA to display in the External Client App Manager.
- Enter the API name to be used when referring to your app from a program. This field defaults to a version of the app’s name with underscores in place of the spaces.
- Enter the contact email for Salesforce to use in case we want to contact you or your support team.
- Select Local for the Distribution State.
- Click Enable OAuth to configure the OAuth policy.
- Enter the app settings.
- Enter the Callback URL. The callback URL is the app URL where you’re embedding the code and the URL can accept the authentication returned from the Salesforce ECA.
An example of a callback URL is
https://<3p-domain>/callback.html. - For OAUTH Scopes, select Manage user data via APIS (api) and Access Analytics REST API resources (wave_api). If you have other OAuth needs, select other scopes as needed. For more information, see OAuth Tokens and Scopes
- Enter the Callback URL. The callback URL is the app URL where you’re embedding the code and the URL can accept the authentication returned from the Salesforce ECA.
An example of a callback URL is
- For Flow Enablement, select Enable Client Credentials Flow. This flow allows for server to server interactions. For more information, see OAuth 2.0 Client Credentials Flow for Server-to-Server Integration
- For Security, disable Require Proof Key for Code Exchange (PKCE) extension for Supported Authorization Flows.
- Click Create.
- On the Policies tab, click Edit. For OAuth Flows and External Client App Enhancements, ensure Enable Client Credentials Flow is enabled. Enter a user email for Run As. This user must be a valid execution user.
- On the Settings tab, click Consumer Key and Secret to copy and save the values. You need the consumer key value for the Client Id and the consumer secret value for the Client Secret.
Enable and Add the Salesforce Output Connector
- From Setup, in the Quick Find box, enter Analytics, select Analytics, and then Settings.
- Select Enable Salesforce output connection and then save your changes.
- In the Data Manager, click the Connections tab.
- Click New Connection.
- Click Output.
- Select Salesforce Output Connector.
- Enter the connection settings.
- Click Save & Test. Save & Test validates your settings by attempting to connect to the source. If the connection fails, Salesforce Data Pipelines shows possible reasons.
All settings require a value, unless otherwise indicated.
| Connection Setting | Description |
|---|---|
| Connection Name | Identifies the connection. Use a convention that lets you easily distinguish between different connections. |
| Developer Name | API name for the connection. This name can’t include spaces. You can’t change the developer name after you create the connection. |
| Description | The connector description. |
| Authentication Type | The supported authentication type. Valid value is OAuth. |
| Username | No longer supported after Winter '27. User name used to connect to external Salesforce org. Required if the authentication type is Password. |
| Password | No longer supported after Winter '27. Password for the user specified in Username. Depending on your security settings, append the user’s security token to the end of the password. For information about obtaining a security token, see Reset Your Security Token. Required if the authentication type is Password. |
| Client Id | The required client ID for your OAuth connection. This value is the consumer key from your External Client App. |
| Client Secret | The required client secret for your OAuth connection. This value is the consumer secret from your External Client App. |
| Service URL | No longer supported after Winter '27. Login URL for the external org. The default value uses the generic Salesforce login URL for your org. For an added layer of security, update this field to use your org’s My Domain login URL. For a production org, use the format:https://<MyDomainName.my .salesforce.com/services/Soap/Identifier/VersionNumber.0For example: |
| Domain URL | The required My Domain URL for your external Salesforce org. In the external Salesforce org, go to My Domain in Setup.
The URL format must be https://*.salesforce.com |
Push Data to Salesforce
With the Salesforce Output Connector configured, build a Data Prep recipe that merges and transforms the data to push to a Salesforce org. Add an output node and configure it to use the Salesforce Output connector.
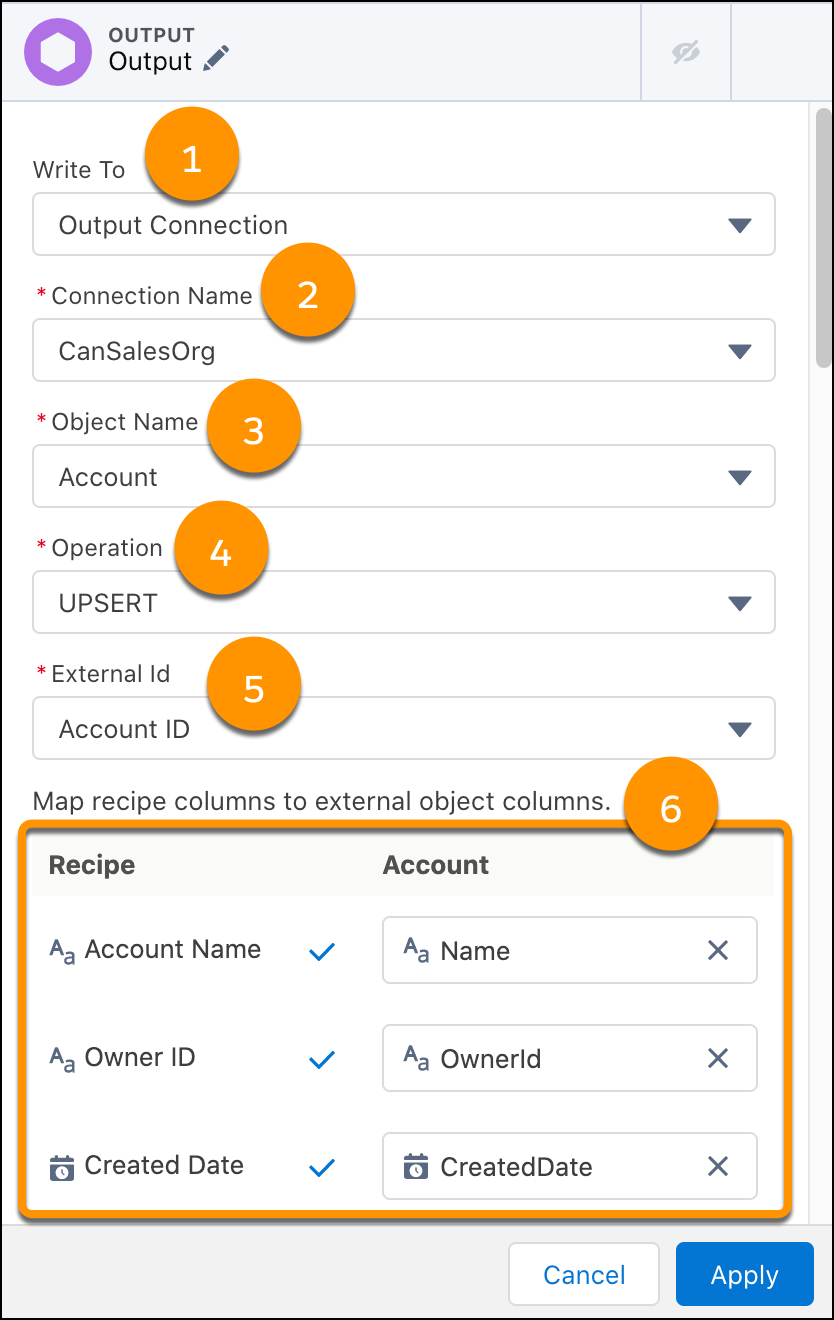
- Select to write to an Output Connection (1).
- Select the connection name of the Salesforce Output connection you created (2).
- Select the destination Salesforce object (3). Objects available to the User ID used to configure the connector are listed. Supported objects are listed in Considerations.
- Choose whether to INSERT (add new records), UPDATE (change data of existing records), or UPSERT (add new records and update existing records). (4)
- If you UPSERT, select a field from the destination object for the External ID to act as the unique record identifier. (5) The default External ID is the connected object’s ID field.
- Map recipe columns to their equivalent Salesforce object columns. (6) All columns must be mapped to apply the output node. Id is only mapped for UPDATE and UPSERT.
- Select Apply.
- Save the recipe.
Salesforce Output Connector Considerations
Keep these behaviors in mind when working with the Salesforce output connector and using a Data Prep recipe output node.
- To troubleshoot unsuccessful or partial failed runs, see Investigate Unsuccessful Salesforce Output Connector Runs.
- You can use an output connection more than once per recipe, but each output node must use a different object. Each output node can use up to the connector's per-run limit independently, but is still subject to the rolling 24-hour limit.
- Output connections are only available for recipes built with Data Prep.
- This connector doesn’t support objects that are the parent or child in a parent-child relationship. If there are two custom objects with a dependency, manually insert the header record, get the header ID, then insert the detail record with those details.
- Sharing descriptors, the ID of any user or group that has access to a record, aren’t included in the output from the source org to the target org.
- This connector supports INSERT, UPDATE, and UPSERT to:
- Custom objects
- Salesforce objects:
- Account
- AccountContactRelationship
- AccountForecast
- AccountProductForecast
- AccountProductPeriodForecast
- AccountForecastPeriodMetrics
- AccountTeamMember
- Activities
- AdvAccountForecastFact
- AdvAccountForecastSetPartner
- Asset
- Campaign
- CampaignMember
- Cases
- ContactPointAddress
- ContactPointEmail
- ContactPointPhone
- Contacts
- CurrencyType
- Event
- Leads
- ObjectTerritory2Association
- Opportunity
- OpportunityLineItem
- OpportunityLineItemSchedule
- OpportunityTeamMember
- Order
- OrderItem
- Product2
- ProgramRebateTypPayoutSrc
- RebateMemberProductAggregate
- RebateProgramMemberPayout
- RebateProgramPayoutPeriod
- Task
- TransactionJournal
- Salesforce Industries objects:
- AccountServicePreference (Health Cloud)
- Claim (Automotive Cloud, Financial Services Cloud, and Manufacturing Cloud)
- ClaimItem (Automotive Cloud, Financial Services Cloud, and Manufacturing Cloud)
- QuoteLineItem (Commerce Cloud)
- SalesAgreement (Manufacturing Cloud)
- Visit (Consumer Goods Cloud)
- To output null measure values to Salesforce, see Enable Null Measure Handling. To output null dimension values, add a bucket transformation for each dimension column with nulls, select Bucket null values, and set the value N/A.
- Calculate API Calls Consumed by Salesforce Output Connector
When you use the Salesforce Output connector to push data from Salesforce Data Pipelines to another Salesforce org, you’re using part of that Salesforce org’s allotted Bulk API batch limit to receive the data. - Troubleshoot an Unsuccessful Salesforce Output Connector Run
The Salesforce Data Pipelines Salesforce Output Connector pushes data from Salesforce Data Pipelines into Salesforce as a Bulk API job. If a portion of the data push fails, use Salesforce Setup and the API to troubleshoot.