
You are here:
Snowflake Private Connection
Pull your data securely from Snowflake into Data Manager using the Virtual Private Connection (VPC) for Snowflake input connector for Salesforce Data Pipelines. To use the Snowflake VPC connector, you configure an outbound network connection, external credential, and named credential. This connector supports private key or OAuth 2.0 for authentication. Using OAuth 2.0 requires additional setup steps in Snowflake and the Salesforce credentials.
Considerations
Use OAuth 2.0 or a private key for authenticating your Snowflake private connection.
Prerequisites
- Requires Salesforce Private Connect. An additional private connect license is required for virtual private connections.
- You must configure your Snowflake for Private Link, to learn how to do this see the Snowflake guide AWS PrivateLink and Snowflake.
For help with configuring this connection so that it’s consistent with your organization’s security requirements, contact your network security or IT department.
Allowlist the Salesforce AWS Account for Snowflake Private Connect
To verify your AWS account is on the allowlist for Salesforce private connect, see Verify Salesforce AWS Account for Private Connect.
Connect to Snowflake with OAuth
To use OAuth 2.0 for your Snowflake private connections, see Setup OAuth for Snowflake Output.
Create an Outbound Network Connection
To create an outbound network connection, see Create the Outbound Network Connection.
Create another connection for the Snowflake integrated S3 storage. This connection is used when the query returns large amounts of data, because Snowflake uses a separate S3 staging area for large data transfers, which requires a dedicated private connection to that S3 bucket. Snowflake splits the data into multiple files and stages them in the integrated S3 storage for downloading. For outbound S3 connections, an extra private connect license is required.
- Find the VPC S3 endpoint service name in the AWS console.
- Click Create Outbound Connection.
- Select AWS PrivateLink, and click Next.
- Give the S3 outbound connection the same name as the primary connection appended with “_S3”. For example, if the primary connection is named SnowflakeVPCOutbound, name the S3 connection SnowflakeVPCOutbound_S3.
- For VPC Endpoint Service Name, enter the endpoint service name you found in the AWS console.
- For Region, select the AWS region that you’re running Snowflake Private Connect in.
- Select Yes, I would like to provision my connection now.
- Save the connection.
Make sure that the Connections status is Ready for both connections. If it isn’t, try syncing the connections.
Create an External Credential
- From Setup, in the Quick Find box, enter Named, and then select Named Credentials.
- On the External Credentials tab, click New.
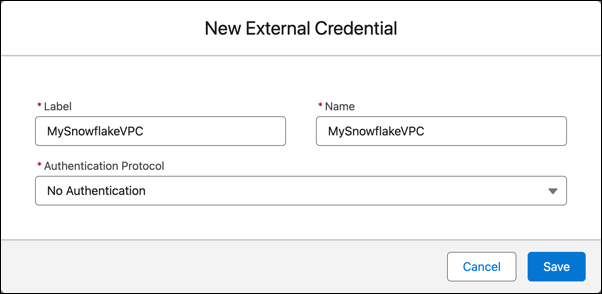
- Enter a label and name.
- For Authentication Protocol, select No Authentication if you aren't using OAuth.
- If you're using OAuth, select OAuth 2.0. Then, select Browser Flow for flow type and your external auth identity provider for the Identity Provider.
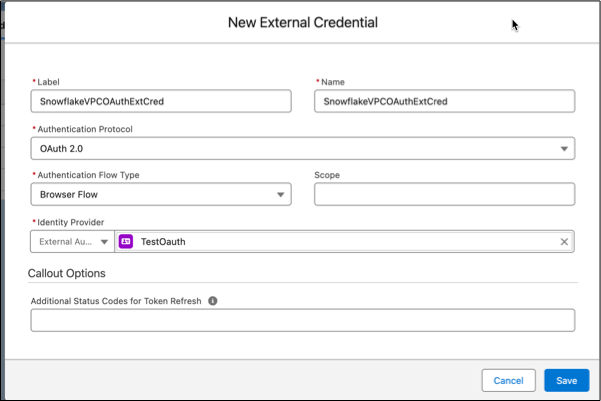
- Save your external credential.
- Open the new external credential
- In the Principals section, click New.
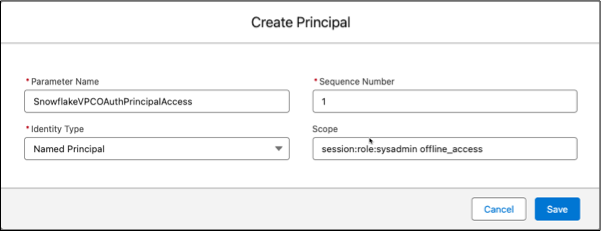
- Enter SnowflakeVPCOAuthPrincipalAccess for the parameter name, 1 for the sequence, and Named Principal for the identity type.
- If you are using OAuth 2.0, set the scope. For the scope, enter two values separated by a space. The first scope value is session:role:target role, matching the scope setup done in the Okta setup step. This allows proper access to the data based on the role.
The second scope value is offline_access, allowing the refresh token returned from Okta.
- Save the principal. Find the action menu for the principal and Authenticate

This opens a browser window to login for Okta. When authentication is successful, the browser redirects to Salesforce and the Authentication Status updates to Configured. If the status isn't updated, review the principal scope settings and the Okta setup.
Now update your user profile with external credential principal access.
- From Setup, in the Quick Find box, enter Profiles, and then select Profiles.
- Select the profile for the Analytics Cloud Integration User.
- Click Enabled External Credential Principal Access at the top of the profile page.
- Click Edit and add SnowflakeVPCOAuthExtCred - SnowflakeVPCOAuthPrincipalAccess.
- Click Save.
Create a Named Credential
- From Snowflake, determine your Snowflake account name from the Account URL field of SYSTEM$GET_PRIVATELINK_CONFIG.
- From Setup, in the Quick Find box, enter Named, and then select Named Credential.
- On the Named Credentials tab, click New.
- Enter a label and name.
- For URL, enter https://<your Snowflake account name>.<your AWS region>.privatelink.snowflakecomputing.com.
- Select the external credential and outbound network connection that you created.
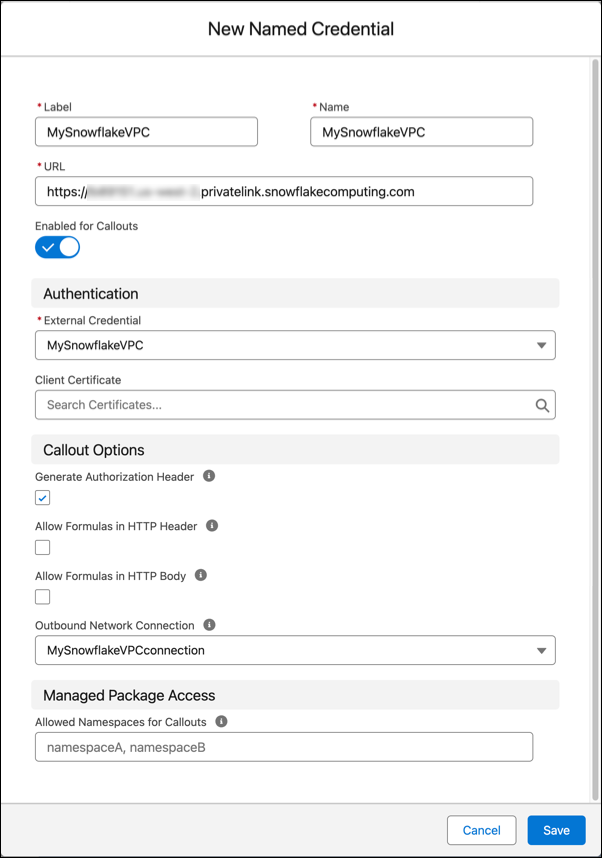
- Save your named credential.
Create a Snowflake VPC Connection
- On the Data Manager Connections tab, click New Connection.
- Select Private, then the Snowflake Private Connector, and click
Next.
- Enter the connector settings.
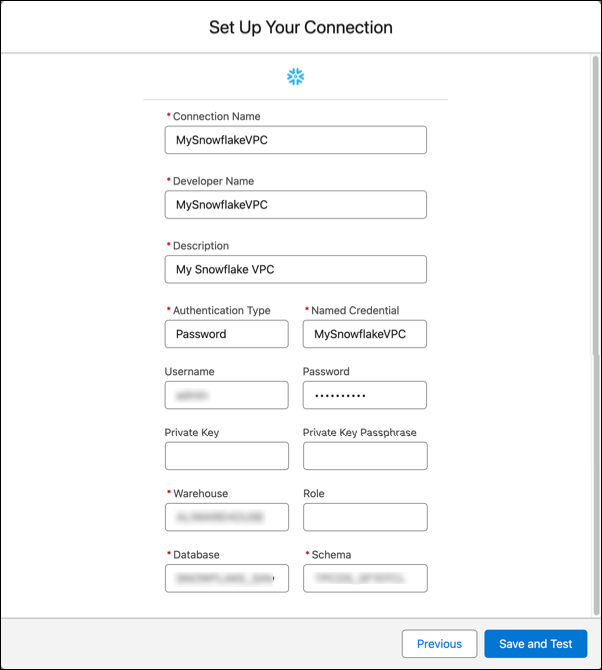
- To validate your settings and test the connection, click Save & Test. If the connection fails, Salesforce Data Pipelines shows possible reasons.
All settings require a value, unless otherwise indicated.
| Setting | Description |
|---|---|
| Connection Name | Use a name that lets you easily distinguish between different connections. |
| Developer Name | The API name is used in your recipes to reference data extracted through this connection. This name can’t include spaces. You can’t change the API name after you create the connection. |
| Description | Description of the connection for internal use. |
| Authentication Type | The type of authentication used for this connection. Accepted values are
|
| Named Credential | The Name field from the named credential stored in your Salesforce org. |
| Username | Optional. Use for non-OAuth connections. The user name for the Snowflake account. |
| Password | Optional. Use for non-OAuth connections. The password for your Snowflake account. |
| Private Key | Optional. The private key for your Snowflake account. Note You must use an encrypted private key and password generated with the Advanced Encryption
Standard (AES). For the detailed steps, refer to Key-pair authentication and key-pair rotation in Snowflake Help. When using
the openssl command to generate the encrypted key, be sure to replace des3 with
aes256 to ensure advanced encryption is used. |
| Private Key Passphrase | Optional. The private key passphrase for your Snowflake account. |
| Warehouse | The Snowflake warehouse name is case-sensitive, so enter the value exactly as it appears in Snowflake. |
| Role | Required for OAuth connectors, optional for no authentication. The Snowflake role assigned to the user name, this must match the role used for the Okta scope, like SYSADMIN. |
| Database | The Snowflake database name is case-sensitive, so enter the value exactly as it appears in Snowflake. |
| Schema | The Snowflake schema name is case-sensitive, so enter the value exactly as it appears in Snowflake. |
Filter Data Synced to Salesforce Data Pipelines
Exclude unnecessary or sensitive data from syncing to Salesforce Data Pipelines with data sync filters. The filter runs on the source object and speeds up data sync by pulling only the data you need into Salesforce Data Pipelines. If you expect to use excluded data in the future, use a recipe filter instead of a data sync filter to limit what’s written to a dataset.
- In Data Manager, go to the Connections tab.
- Select the connection associated with the object to filter.
- Click the object to filter.
- Click Data Sync Filter, and enter the filter.
- Click Save.
For the Snowflake connector, enter a SQL filter as described in the Snowflake WHERE documentation.
Remember these behaviors when working with the Snowflake connector.
- You can only move data from Snowflake to Salesforce Data Pipelines with this connector. It doesn't upload data from Salesforce Data Pipelines to Snowflake.
- Connected object names must start with a letter and contain only letters, digits, or underscores. An object name can’t end with an underscore.
- Only field names with combinations of alphanumeric, dot, underscore, or dash characters are supported. If a connector includes field names that contain other characters, such as spaces or brackets, the sync fails.
- Rounding errors can occur in floating-point numbers when Snowflake performs the query that sends data to the connector. See the Snowflake help Data types for floating-point numbers for more information. If an ID is specified as a floating-point number in Snowflake, these errors can result in incorrect IDs being sent to the connector. Use the NUMBER or equivalent data type for IDs in Snowflake.
- You can set a Snowflake warehouse to automatically resume or suspend. Review the Snowflake documentation for information about the optimal use of these features.
- The named credential must use the identity type Named Principal and have the status Authenticated.