
You are here:
Configure Salesforce Identity for Enablement
To set up Salesforce Identity for Enablement for your enablement site, first create a connected app in Salesforce. The connected app handles data sharing between your enablement site and Salesforce using OpenID Connect and OAuth 2.0—protocols that authenticate users and authorize access to data in your org. Finally, enter your connected app details on your enablement site.
Required Editions
| Available in: Enterprise, Performance, and Unlimited Editions |
| User Roles and Permissions | |
|---|---|
| Enablement Site User Roles | |
| This topic supports these enablement site roles: | Salesforce Admins |
| Required System Permissions | |
| To read, create, update, delete, install, or uninstall connected apps: | View Setup and Configuration AND Customize Application AND Modify All Data OR Manage Connected Apps |
| To configure the authentication provider: | Manage Site Settings |
Before you get started, review these important considerations.
- Make sure that you set up your enablement site before you create the connected app, which requires the URL that you created for your enablement site's subdomain.
- Create the connected app in production, not a sandbox.
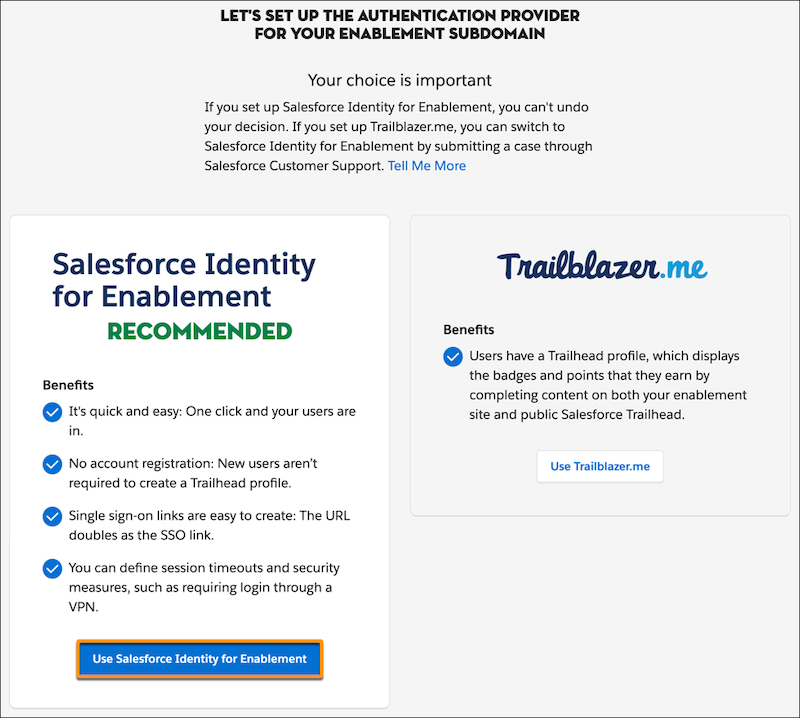
- After you activate Salesforce Identity for Enablement, you can’t change your authentication provider to Trailblazer.me (TBID).
- Determine whether your enablement site supports only internal users from your Salesforce org or supports only external users who are Experience Cloud site members. With Salesforce Identity for Enablement, it’s difficult to make your enablement site available to both internal and external users, so we recommend that you choose one. This choice affects the authentication page URL that you enter in step 9.c.
- From Setup, in the Quick Find box, enter Apps, and then select App Manager.
- Click New Connected App.
-
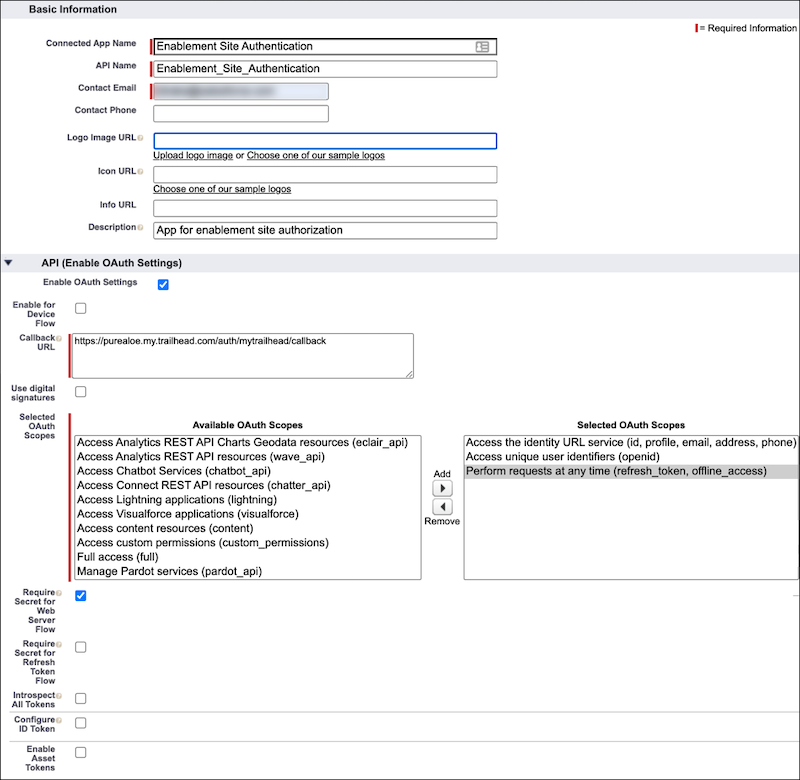
In the Basic Information section, enter the app’s name and contact info.
Field Value to Enter Connected App Name An internal name for the app, such as Enablement Site Authentication. API Name A unique programmatic name for the app in your org. You can accept the default suggested name or enter your own. Contact Email The email address that Salesforce uses for contact about the app, if necessary. Description A brief description of what the app is for. -
In the API (Enable OAuth Settings) section, specify the connected app’s authorization
details.
- Enable Enable OAuth Settings.
-
For Callback URL, enter your enablement site URL—including the
https:// protocol—and add
/auth/mytrailhead/callback.
For example, the callback URL for the Pure Aloe enablement site is https://purealoe.my.trailhead.com/auth/mytrailhead/callback.
 Important If you enter the callback URL incorrectly and then complete Salesforce Identity for Enablement setup, your users can’t log in to your enablement site.
 -
For Selected OAuth Scopes, add only these scopes to the list of selected scopes:
- Access the identity URL service (id, profile, email, address, phone)
- Access unique user identifiers (openid)
- Perform requests at any time (refresh_token, offline_access)
- Enable Require Secret for Web Server Flow.
- Disable Require Secret for Refresh Token Flow and Introspect All Tokens.
-
Review all the details that you entered, and save your changes.
- On the New Connected App page, click Continue.
-
Edit the connected app’s OAuth access policies and specify which users the app
authorizes.
-
On the connected app’s page in App Manager, click Manage.

- Click Edit Policies.
-
In the OAuth Policies section, use the Permitted Users dropdown to select which users
your connected app authorizes.
- All users may self-authorize
- Any user from your org can access your enablement site with their credentials, but they must first consent to the app logging them in.
- Admin approved users are pre-authorized
- Users assigned to specific profiles or permission sets can access your enablement site with their credentials. They aren’t required to consent to the app’s activity. This option provides the smoothest login experience.
- Optionally, use the IP Relaxation, Refresh Token Policy, and Timeout Value options to add extra security measures around the authentication.
- Save your changes.
-
On the connected app’s page in App Manager, click Manage.
-
If you selected Admin approved users are pre-authorized for your
app’s OAuth permitted users, select the profiles or permission sets to pre-authorize for access
to your enablement site. If you selected All users may self-authorize,
skip this step.
- On the connected app’s page, scroll to the Profiles section, and click Manage Profiles. Or, scroll to the Permission Sets section, and click Manage Permission Sets.
- Select which profiles or permission sets to preauthorize, and save your changes.
-
Locate the connected app’s consumer key and consumer secret.
- From Setup, in the Quick Find box, enter Apps, and then select App Manager.
-
Scroll to your connected app, and select View from the app’s
dropdown.

-
On the connected app’s page, scroll to the API (Enable OAuth Settings) section, and click
Manage Consumer Details.
You're prompted to verify your identity before you can view the consumer details.
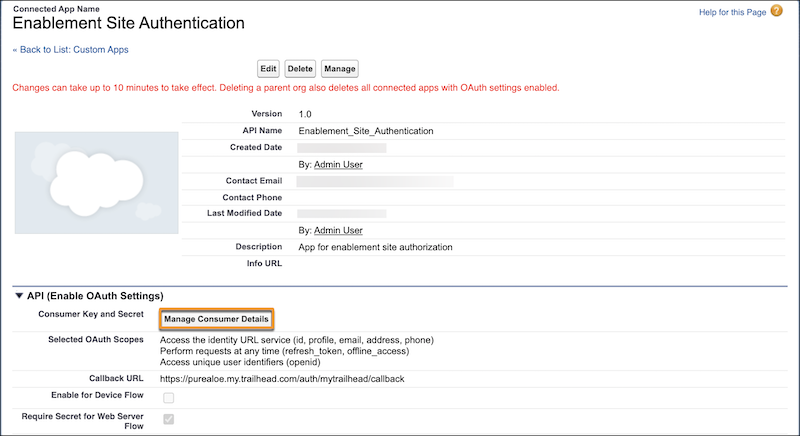
- Copy the consumer key and consumer secret to a handy, secure location. You use these values to complete Salesforce Identity for Enablement setup.
-
Finally, configure your enablement site with the connected app details.
- If you aren’t already there, go to https://trailhead.salesforce.com/subdomain/mytrailhead-id/setup.
-
Click Use Salesforce Identity for Enablement.
-
On the Identity Setup page, under Step 2, enter these details:
- The URL for your enablement site’s login page.
- The Consumer Key that you copied from your connected app.
- The Consumer Secret that you copied from your connected app.
The login page URL isn’t the same as the callback URL that you created for your connected app. Your login page URL depends on whether your enablement site supports internal users from your Salesforce org or external users who are Experience Cloud site members.
Enablement Site Audience URL to Enter Internal users Your org’s My Domain login URL, such as https://purealoe.my.salesforce.com. External users Your Experience Cloud site URL, such as https://fixcoffee.com/community. Important Take extra care when you enter this information. If you enter it incorrectly and activate Salesforce Identity for Enablement, you’re locked out of your enablement site. To regain access, contact Salesforce Customer Support. - Click Activate, and confirm your decision. This action is irreversible.
- Log in with your Salesforce or Experience Cloud credentials, depending on which audience your enablement site serves.
All your enabled users can now log in to your enablement site. Next, you can move on to these other admin activities.
- To add a link to your enablement site in your Salesforce org, you can edit the connected app that you just created.
- To enable Experience Cloud site members as users, connect your enablement site to your Experience Cloud site.
- To make sure that your content creators can access Trailmaker, assign the appropriate permissions for different roles.
- To make sure that learners can access the appropriate published content, create content collections and assign permissions to learners.
- To continue configuring your enablement site's settings, you can add your logo and color and manage content filters.